Module 2: Breathing with

Site: Helsekompetanse
Course: Breathe
Book: Module 2: Breathing with
Printed by: Gjestebruker
Date: Sunday, 15 September 2024, 4:34 PM

Breathing with...


Reduced muscle power and actuated control of one’s breathing can lead to the need for respiratory support, so-called mechanical ventilatory support. Such treatment intends to increase the lifespan and/or improve the quality of life of patients. If you receive such therapy or are a friend/relative or work with someone who receives ventilatory support, you need to obtain some information and skills.

In this chapter you will be introduced to:

  • the principles of ventilatory support and how it can help breathing;
  • how the ventilatory support machines work;
  • how the treatment can be administered via a mask or tracheostomy;
  • why it is essential to cough correctly and what you can do with excess drooling;
  • preparedness for acute adverse events.

Learning outcomes

Upon completion of this chapter, you will have acquired basic knowledge on what long-term mechanical ventilation is and the purpose of masks, tracheostomies and mouthpieces. You will also have learnt how to manage problems with drooling and acute adverse events.

What is LTMV?


LTMV stands for long-term mechanical ventilation.

This treatment takes into use mechanical assistive devices to ensure that the body can breathe if someone is unable to adequately breathe independently. It was previously called home ventilator therapy. Vanja’s mother tells her story:

What the National Professional Guidelines for LTMV say:

The guidelines aim to contribute towards:

  • providing a service based on equality, regardless of age, sex, domicile, socioeconomic status or ethnic origin, as well as
  • uniform and quality patient care.

Read more about the national guidelines for LTMV here:

Three LTMV users

We have interviewed three LTMV users to tell us how they feel about living with assistive respiratory devices. The user experiences might help you if you use an assistive respiratory device of know of someone who does or if you are employed as an assistant for such a user. It might be relevant if you are training to be a health professional or will soon be working for an LMTV user as an assistant. Or maybe you just want to learn more about this topic?
     
Often it is important to listen to the stories of those who need LTMV to gain a better understanding of how they feel about their situation. In the first part of the course, Living with the situation, you will meet Jørgen, Vanja and Øyvind, who live with respiratory support. You will also meet them later in the course.

Ventilatory support


Normal breathing


The blood in the lungs takes up oxygen and gets rid of carbon dioxide. This gas exchange occurs in tiny airs sacs within the lungs called alveoli, which constantly receive new air and expel the used air when we breathe.  Thin blood capillaries are in close contact with the air in the alveoli and gases can penetrate through the wall of the thin sacs. The body’s metabolism needs oxygen and the waste gas of the metabolic process is carbon dioxide.

Oxygen binds to the red blood cells and carbon dioxide is dissolved in the blood. In order for these gases to maintain a normal balance in the body, for example, to enable the nervous system to control the activity of the respiratory muscles in the normal way, we depend on many factors. The muscles must also be strong enough, so we can take deep breaths, and the chest and spine must not be stiff and hinder the respiratory muscles from passing enough air down into the lungs. In addition, the lungs and airways must not be damaged in a way that makes it difficult for oxygen to be taken up and carbon dioxide removed.


Respiratory failure

Many chronic respiratory failure patients, who need help with home mechanical ventilation have healthy lungs, but at the same time a respiratory muscle disease or damaged nervous system that leads to the paralysis of such muscles. The body’s ability to pump air in and out of the lungs is damaged, but when the air passes down into the lungs it is used in the normal way. Consequently, weaker breathing leads to an abnormally high amount of carbon dioxide in the blood and an abnormally low amount of oxygen. The medical term for this type of respiratory failure is low ventilation or hypoventilation. We breathe less and poorer when we are asleep than when awake. The respiratory muscles must work harder, they become tense and never get to rest before having to deal with the activities of the next day. Respiratory failure is therefore worse at night and, in many cases, this explains the initial symptoms of hypoventilation and the fact that many patients only need respiratory support during the night.


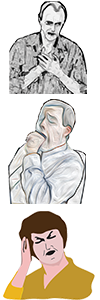
Potential symptoms of respiratory failure:

  • Frequently disturbed sleep during the night, restless sleep.
  • Sleepiness during the day.
  • Tiredness after sleeping.
  • Fatigue
  • Reduced concentration
  • Morning headaches
  • Heavy breathing whilst resting or during exertion.
  • Heavy breathing when lying flat on one’s back.
  • Frequent airway infections
  • Loss of appetite
  • Weakness
  • Loss of weight

dfg


The consequences of respiratory failure could be the feeling of being under the weather, exhaustion and morning headaches. One often feels tired and sleepy during the day, especially in situations with monotone activities, such as reading, watching TV, driving, etc. In such situations, it is not uncommon to fall asleep. The ability to concentrate, learn and memorise can become impaired, and one can feel depressed and indifferent. Some people may notice reduced physical performance and others rapid breathlessness on exertion. Decreased appetite may also occur.

When coughing muscles, like the abdomen, are weak, mucus builds up in the airways. The mucus is a breeding ground for bacteria; therefore it is easy to contract infections, such as bronchitis and pneumonia. These airway infections cause the respiratory muscles to work even harder and can cause sudden (acute) severe respiratory failure, which can be fatal if not treated correctly and in time.

Respiratory failure often develops slowly over time, consequently it is easy to overlook. Occasionally, family or friends are the first to notice changes in performance or behavour, for example, if one seems more easily tired, sleepy or forgetful.

How is respiratory failure detected?

People with disorders that could lead to hypoventilation should be offered regular check-ups with a pulmonologist. When symptoms appear, a doctor’s check-up along with any supplementary investigations of breathing during asleep, can confirm whether or not there is a problem and what can be done. In addition to one’s medical history and symptoms, investigations can be carried out to measure oxygen and carbon dioxide in the blood during the day or night. The volume of the lungs and the strength of the respiratory muscles are measured during the initial investigation. Some investigations need to be performed at the hospital others can be done at home with transportable equipment.

Who can benefit from the therapy?

People with muscle weakness and neurological diseases that affect the respiratory muscles can develop respiratory failure and therefore require help to relieve inspiratory muscles. A stiff chest or severely skewed spine can also lead to respiratory failure. The work involved with sucking air into the lungs becomes an overburden. The muscles are unable to maintain normal levels of ventilation. Some patients with severe obesity can develop respiratory failure, partly because the respiratory muscles become too weak and partly because the respiratory centre that controls respiratory activity functions abnormally. The primary damage in some patients is found in the respiratory centre, which disturbs the regulation of breathing. Consequently, they will need therapy.

What types of breathing machines are available?   

We can treat diseases that lead to chronic respiratory failure with hypoventilation and uncomfortable symptoms, with mechanical respiratory assistance. In modern terminology, the collective term is long-term ventilation support. This includes both advanced breathing machines, usually called ventilators, and simpler BiPAP machines. Both are mechanical air pumps that help the respiratory muscles by pressing air down into the lungs via the airways. The air goes from the pump through a hose to the user. In most cases, the hose is connected to a mask that either covers the nose or both the nose and mouth.  Occasionally, some patients may use an invasive device, a plastic tube (tracheostomy cannula) instead of a mask. The cannula enters directly through the skin into the windpipe. The opening is made surgically, a so called tracheostomy (see later chapter).

Ventilators and BiPAP machines: Mechanical air pumps


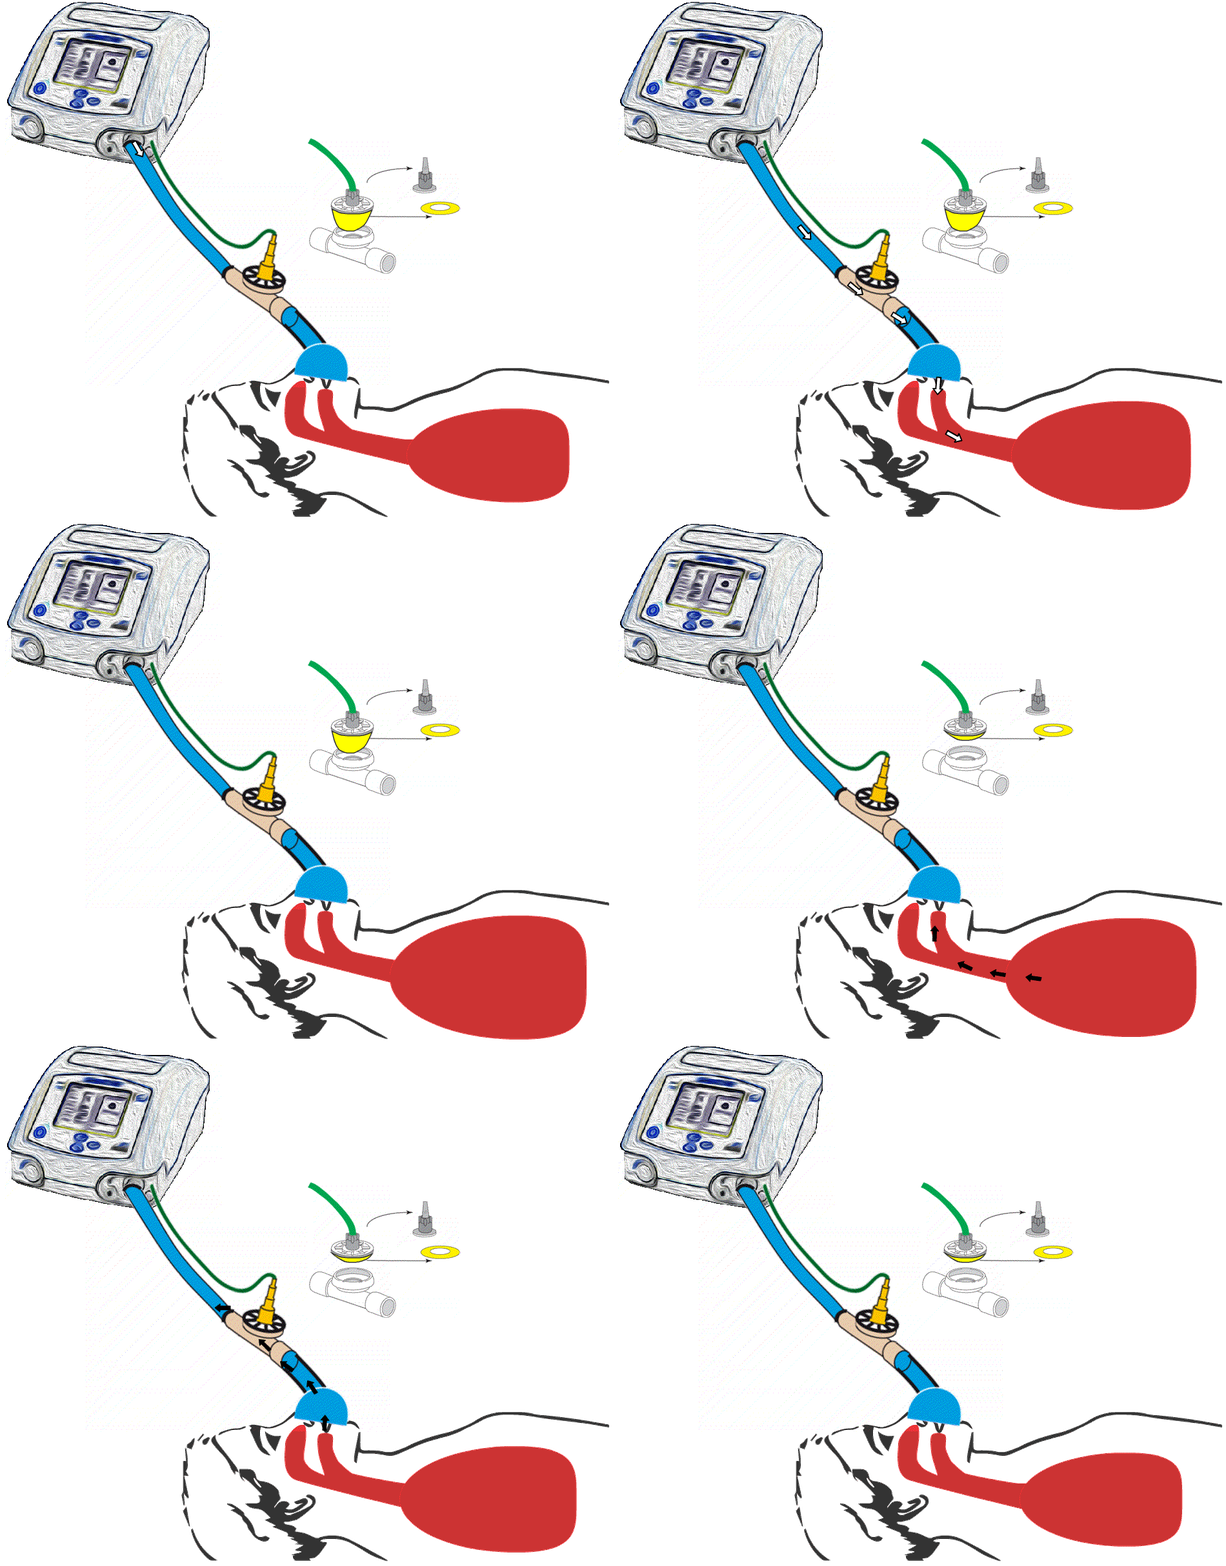
Animated illustration of how a BiPAP machine works. BiPAP presses air down into the lungs and creates deeper aspirations for the user.

hgfdhg
Animated illustration of how a BiPAP machine works. BiPAP presses air down into the lungs and the pressure changes the deepness of breathing in the lungs.

asd

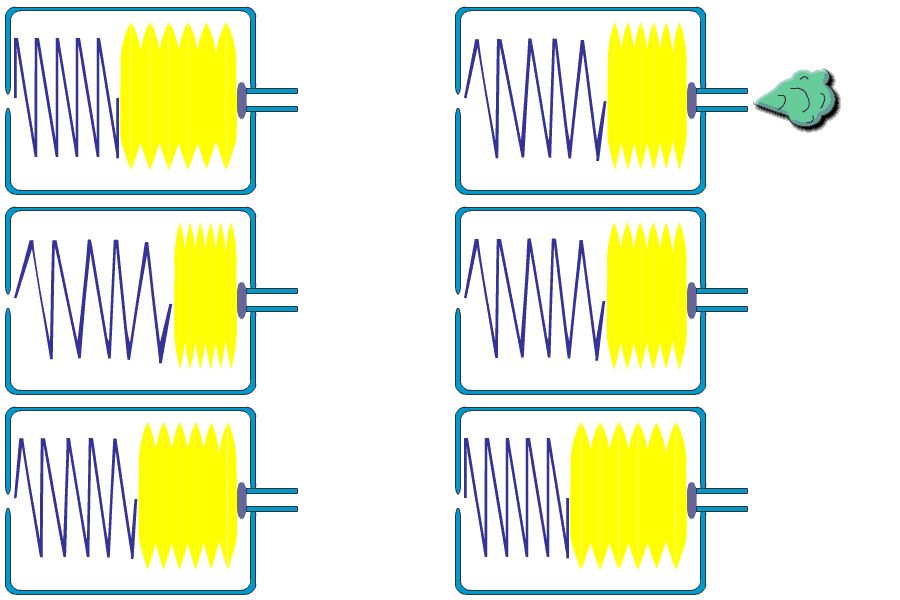
Animated illustration of how the first ventilators had a bellows that pressed air into the tube.

sad

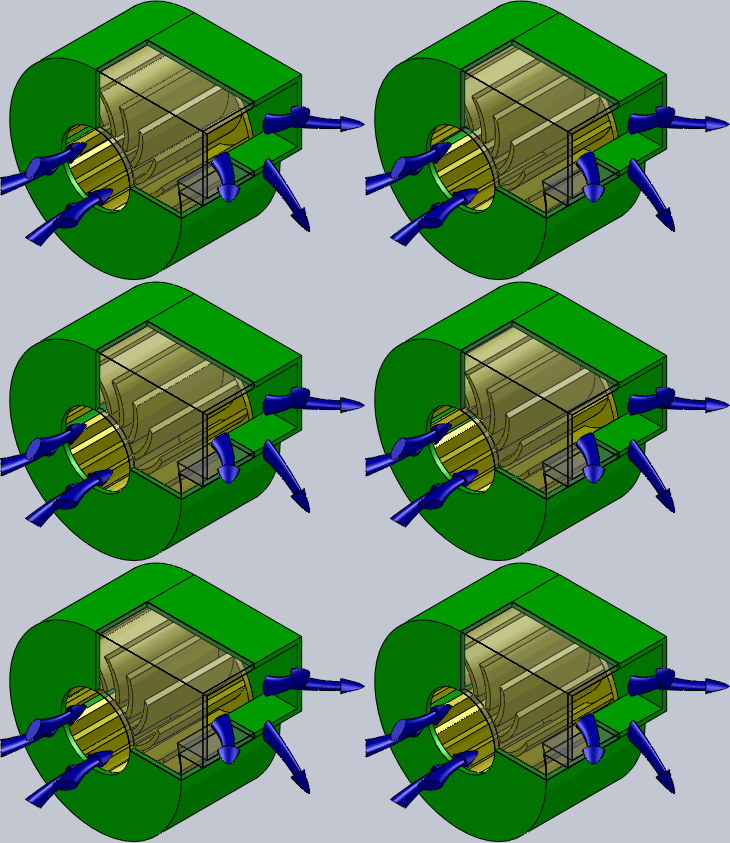
Animated illustration of how turbines now create the air flow in all machines.

List of definitions

  1. Respirator - ‘re’ - ‘spira’ = ‘a person who rebreathes’ - an advanced breathing machine approved for patients who require around the clock respiratory assistance (a-life-sustaining ventilator).
  2. Ventilator - ‘vent’ - wind + ‘tor’ = ‘to blow out’ - synonym of respirator and the term that is more commonly used abroad (hyperlink to the ventilator tab).
  3. BiPAP = Bi-level Positive Airway Pressure. This is a simpler breathing machine that is generally used by patients who do not need around the clock respiratory assistance.

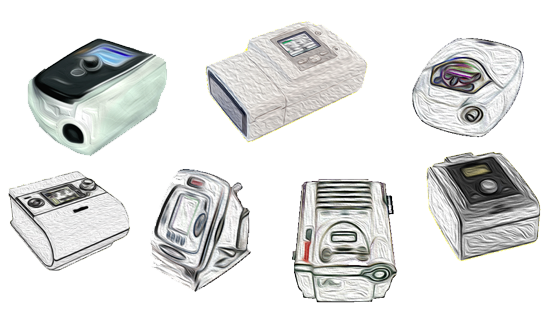
saIllustrations of different types of BiPAP machines.

4. Long-term mechanical ventilation (LTMV) is a collective term for all air pumps that are suitable for use outside hospital environement or at home (BiPAP and ventilators).


How will respiratory support affect me?

A BiPAP machine or ventilator can wholly or partially replace the work of the respiratory muscles. This relieves weak and over-exerted respiratory muscles. The lungs can inhale deeper with less accumulation of mucus. Thus, it is easier to avoid infections. Oxygen and carbon dioxide levels in the body become more normal. The quality of sleep improves and one becomes more alert and awake during the day. Daily living improves even during the periods when respiratory assistance might not be required. One gains more energy and is able to perform better.


Breathing equipment


Chronic hypoventilation may provoke many disabling symptoms. A ventilator may reverse symptoms by relieving inspiratory muscles. In general, the term ‘respirator’ is most commonly used to denominate sophisticated, life-sustaining machines. Simple equipment, more often used for night-time support of breathing usually belongs to a group of called BiPAP machines. However, both types of machinery are basically mechanical air pumps that unload the burden of respiratory muscles by pressing air down into the lungs via the airways. The air goes from the pump through a hose to the user. For most patients, the tube is connected to a mask that either covers the nose or both the nose and mouth.

BiPAP


BiPAP machines (Bi-level Positive Airway) are the most common machines currently used for respiratory failure. More than 8 out of 10 patients, with differing needs for long-term mechanical respiratory support, have such equipment. The reasons being that the machines facilitate adaptation and are easy to use. They are also more affordable than more advanced ventilators, which have more additional features.

Most of the machines do not have a built-in battery, even though many can be connected to an external battery. As indicated by its name ‘Bi-level’, the air flow pressure of the machine works on two levels. The pressure must be higher, i.e. positive airway pressure, than the ambient air in order for the air to be pressed down into the lungs. The video illustrates how the pressure changes the depth of breathing.


Animated illustration of how the BiPAP machine works. BiPAP pushes air into the lungs and helps the user to take a deeper inhale .

.
Animated illustration of how the BiPAP machine works. BiPAP pushes air into the lungs, and the pressure changes the depth of the breathing in the lungs.


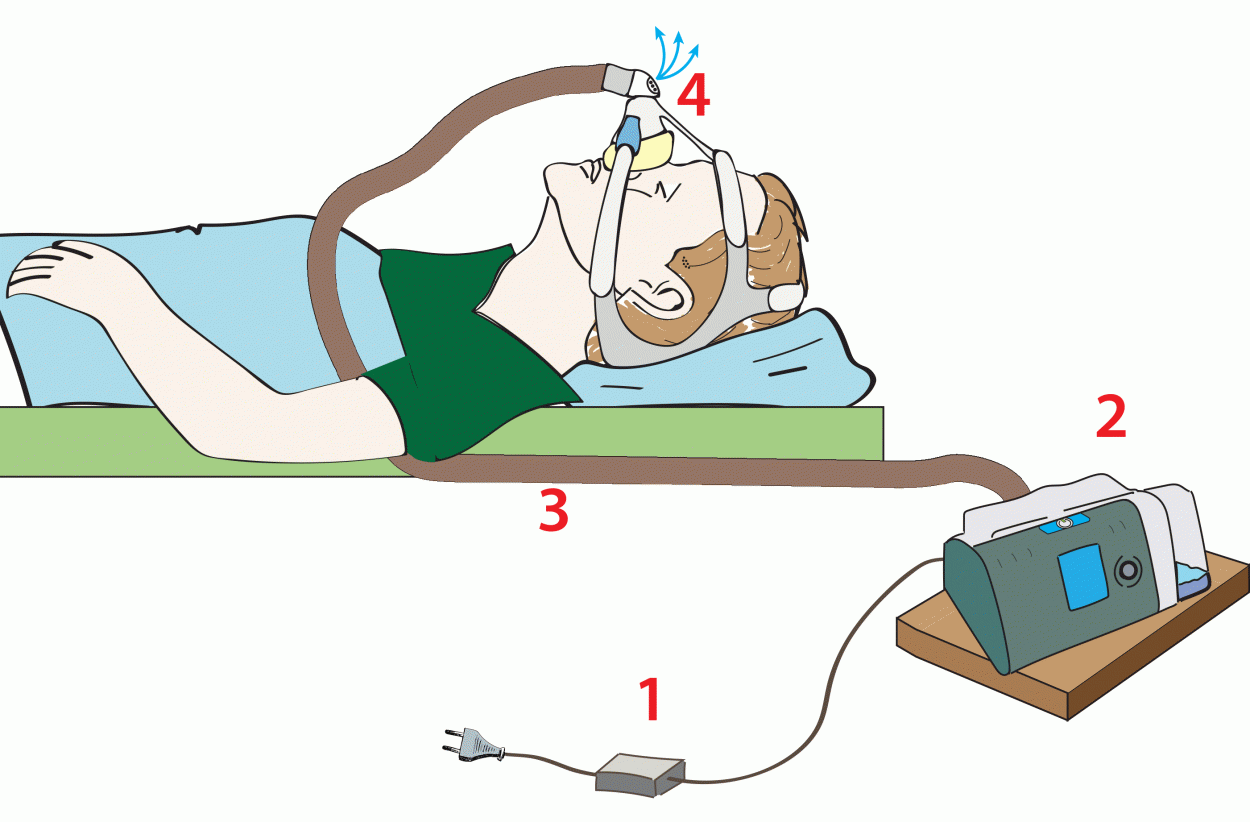
Connection

Most BiPAP machines require power from the mains supply, as they do not have a built-in battery. It is easy to connect the machines. How to connect the machines:

  1. Power cord with a converter
  2. BiPAP
  3. Hose
  4. BiPAP mask (with expiration hole) (see About mask therapy)

.
The four steps of how to connect a BiPAP machine.

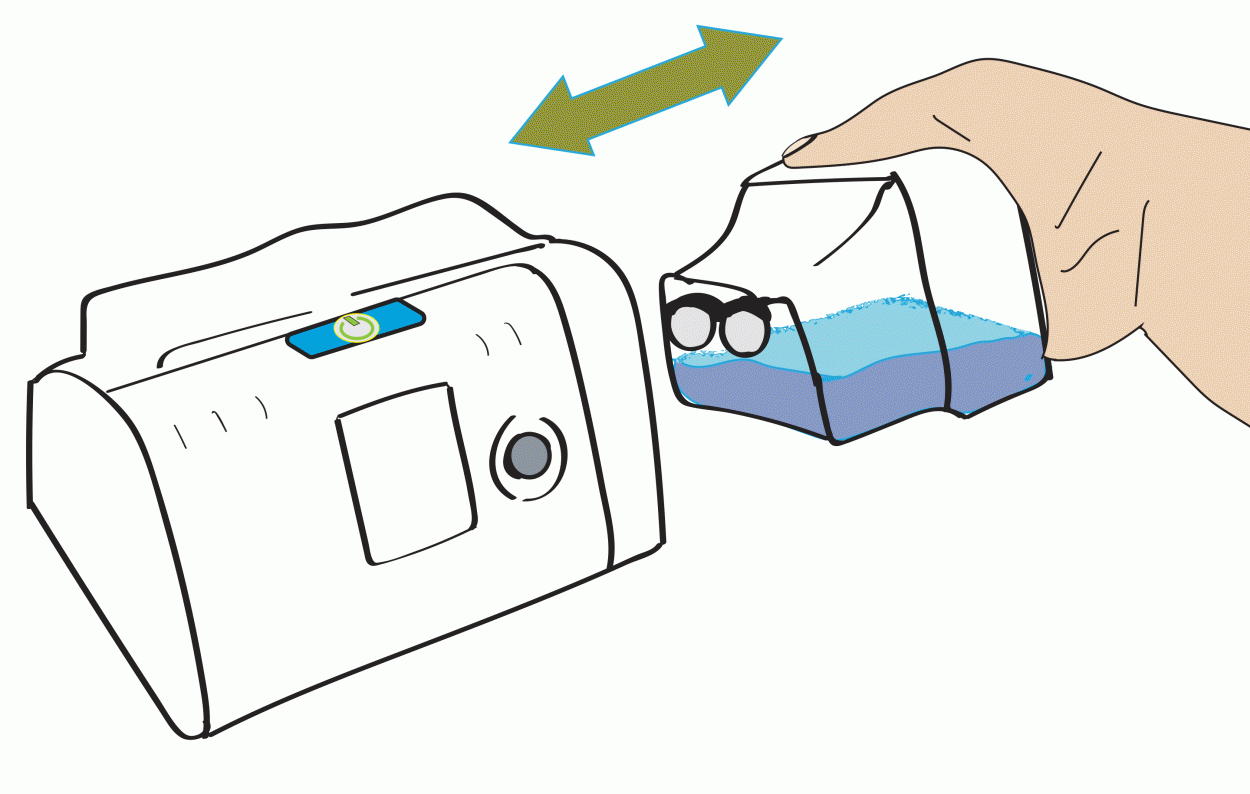
Most BiPAP machines can be connected to a humidifier, as an additional component of the machine. The humidifier has a chamber that is filled with normal tap water and a hotplate, the temperature of which regulates the humidity of the air. The water must be replaced daily and the chamber must be cleaned twice per week.

.


On/Off

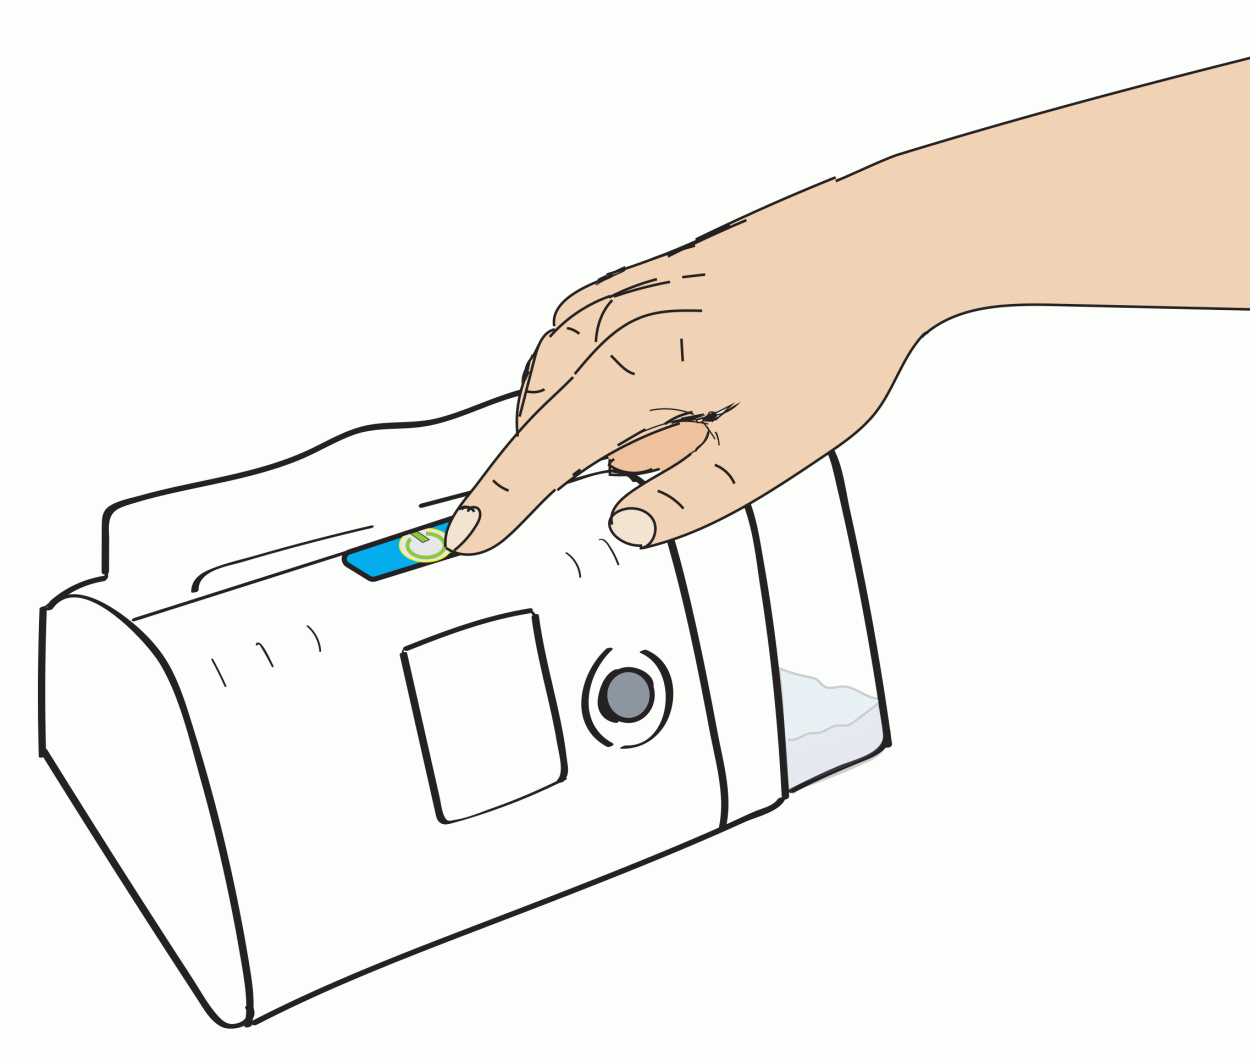
BiPAP machines are normally started and stopped by pressing once on the same button. This is not the case with life-sustaining ventilators ("respirators") nor some of the most advanced BiPAP machines, which often require confirmation that the machine must indeed stop, e.g. by pressing a different button or pressing the same button twice.

.

Alarms

The doctor can set different alarms, for example, to alert slow or low-level breathing. However, such alarms are rarely used with BiPAP therapy. On the other hand, alarms are commonly used for significant leakage from the mask, for example, if the mask falls off. Other alarms can be activated for power failure or stoppage of the machine for other technical reasons. In general, an alarm will sound with a combination of sound and light signals or screen symbols. For more detailed information, see ‘In Norway’ below.

You can easily test whether the leak alarm has been turned on by starting the machine without putting the mask on. Some patients want as few alarms as possible and it is up to the doctor to decide what is safe and appropriate. For most patients it will not normally be hazardous to sleep one night without the machine, even though it is disadvantageous to do so. In the long-term it can adversely affect your health if you become lazy with the therapy.

Cleaning and servicing equipment

All BiPAP machines have some type of filter that coarsely removes dust from the air, similar to a vacuum cleaner. Replacement filters are normally provided with a new machine. When these have been used, the hospital unit for therapy assistive devices (SBH) will issue new filters. SBH is responsible for all consumable items and servicing of the equipment. The BiPAP tube should be washed once per week with a mild detergent and thoroughly rinsed before drying. The actual BiPAP machine only needs dusting. See the separate section for cleaning masks.

Carrying out checks/follow-up/adjustments

All modern BiPAP machines can store information on the therapy in terms of how it is working, i.e. information about how the machine has been used, whether there has been substantial leakage, how much and how fast air is breathed, and whether breathing has stopped. This information is very useful for doctors and nurses when patients attend check-ups, as it can provide an indication of whether the settings need adjusting or whether the mask is good enough. Normally, BiPAP patients attend a check-up at the pulmonary outpatient clinic every six months, but this can vary quite a lot. Some patients require more frequent check-ups, whilst annual check-ups are enough for others.

Problems during the adaptation period

Problems that arise during the adaptation could be caused by the mask or machine. The first-mentioned is described in detail under ‘Mask therapy’. A doctor or nurse generally adjusts machines that are not optimally set, as such the machine needs to be ‘unlocked’. However, some machines have so-called ‘comfort settings’, which patients can adjust themselves. For example, rise time (how quickly the pressure rises when aspiring air) and the temperature of the humidifier (how hot and humid the air should be).

User manual

The user manual for the newer generation of BiPAP machines can be downloaded from the web page of the National advisory unit on long-term mechanical ventilation.

Ventilators

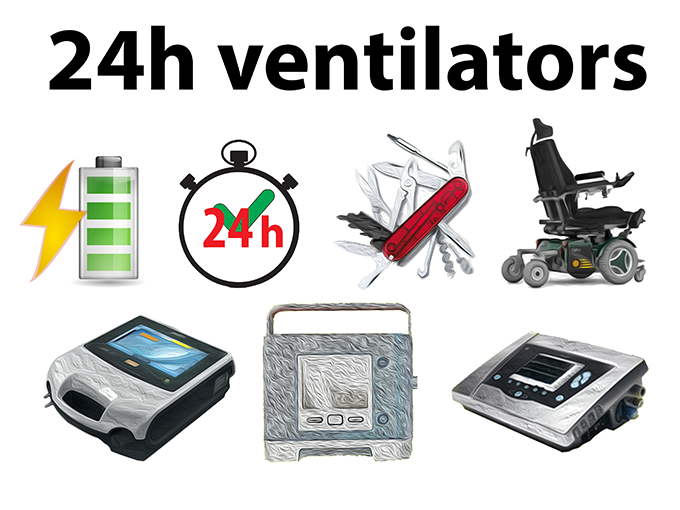
A life-sustaining ventilator ("respirator") differs from a BiPAP machine primarily because it is also approved for usage when one is completely dependent on a machine to stay alive. It must have an in-built battery in case of power failure and a full range of alarms. Due to battery they are suitable for use during transportation. They also durable and withstand severe physical blows, for example, falling off a table or a wheelchair.


Image showing battery source, clock displaying 24 hours, swiss army knife, electric wheel chair, three different medial equip


Ventilator

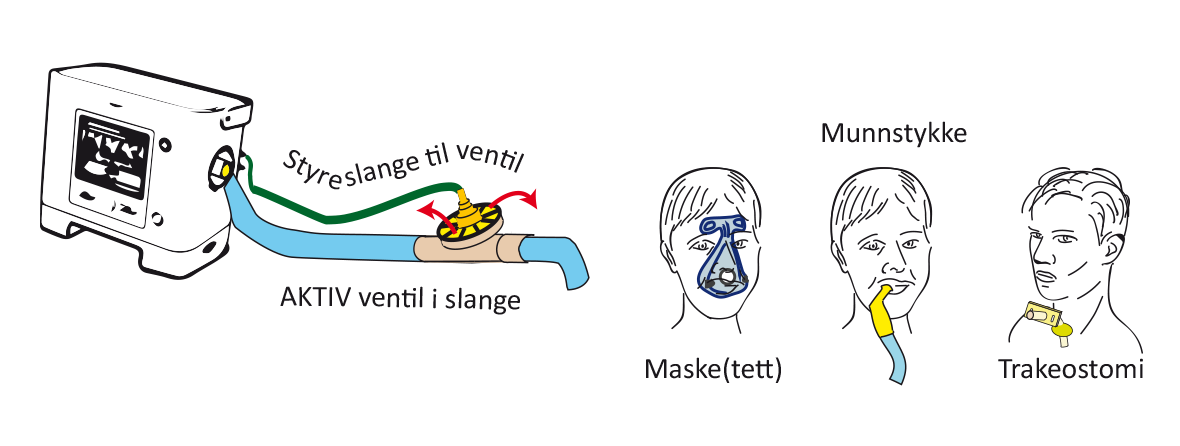
Patients with a tracheostomy will always need asuch advanced ventilators, but even in nonivasive (ie mask or mouth piece) ventilation, users may need the flexibility and security provided by a "respirator". The breathing circuit, i.e. the hose from the ventilator to the user, may be similar to that of a BiPAP machine, but a more advanced valve is often used to control the shift of ventilation from inspiratory to expiratory phase.

.
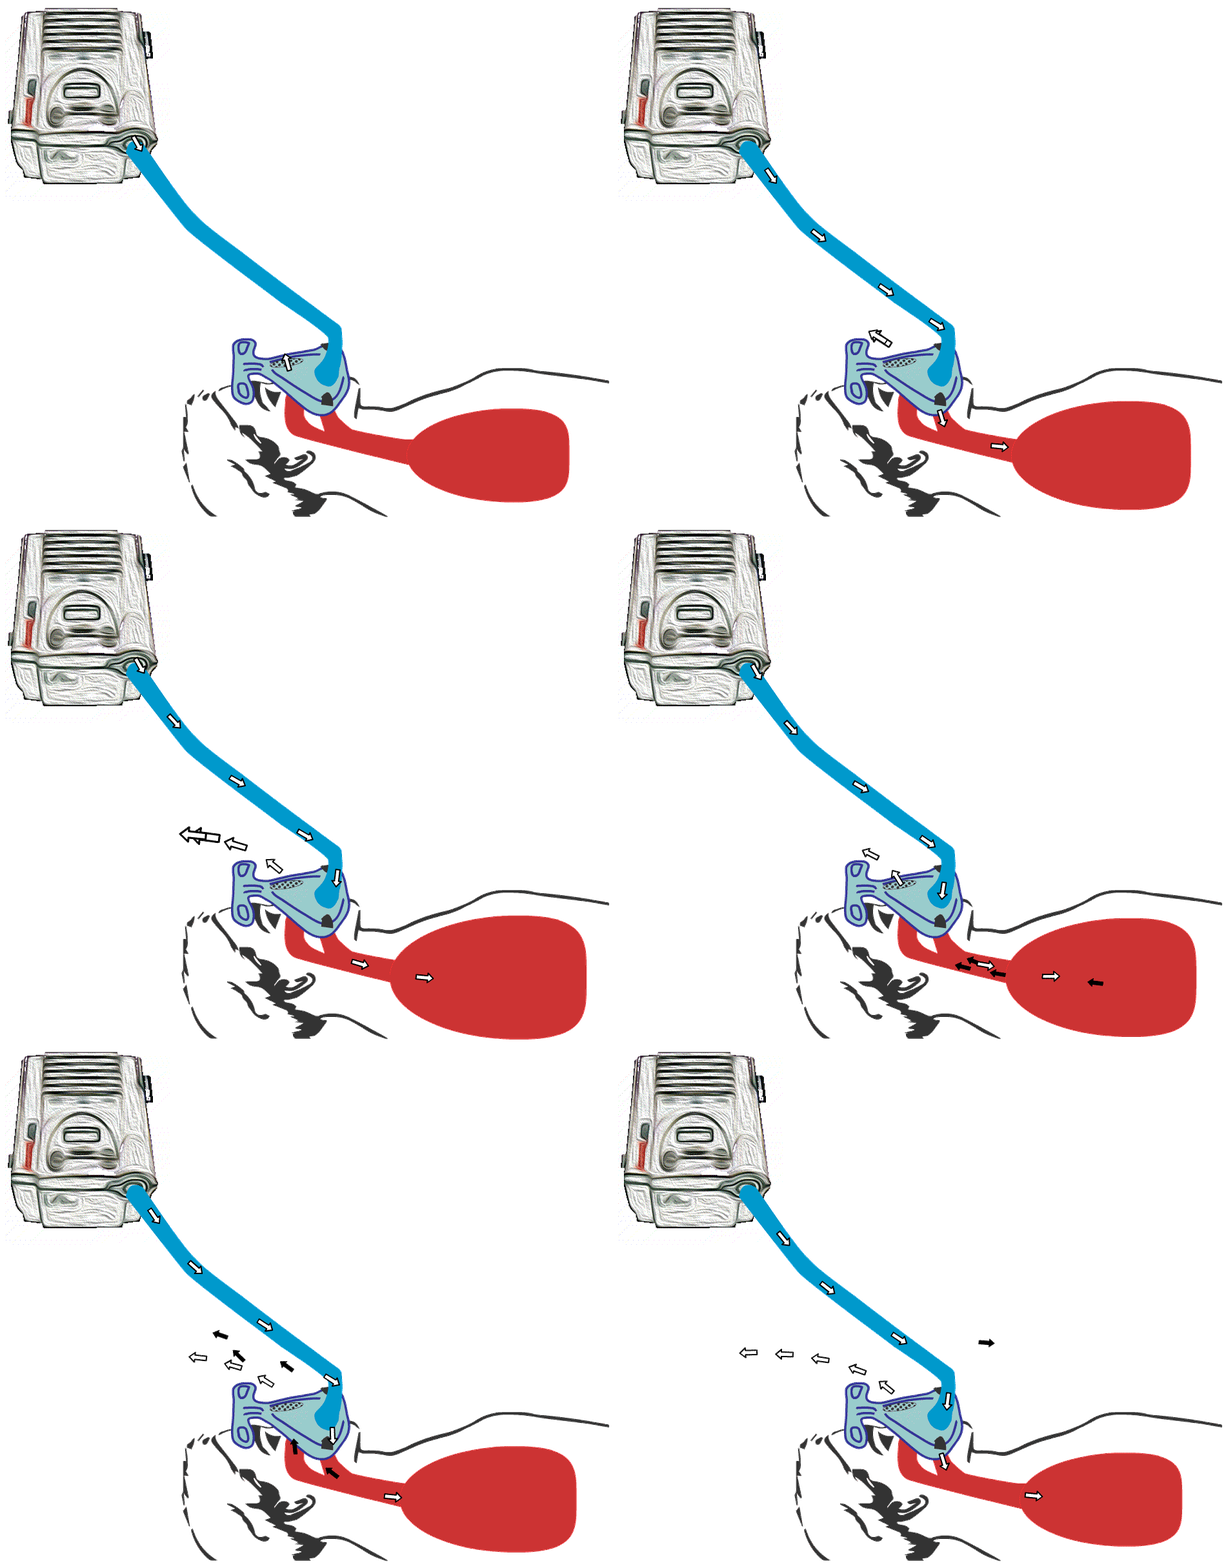
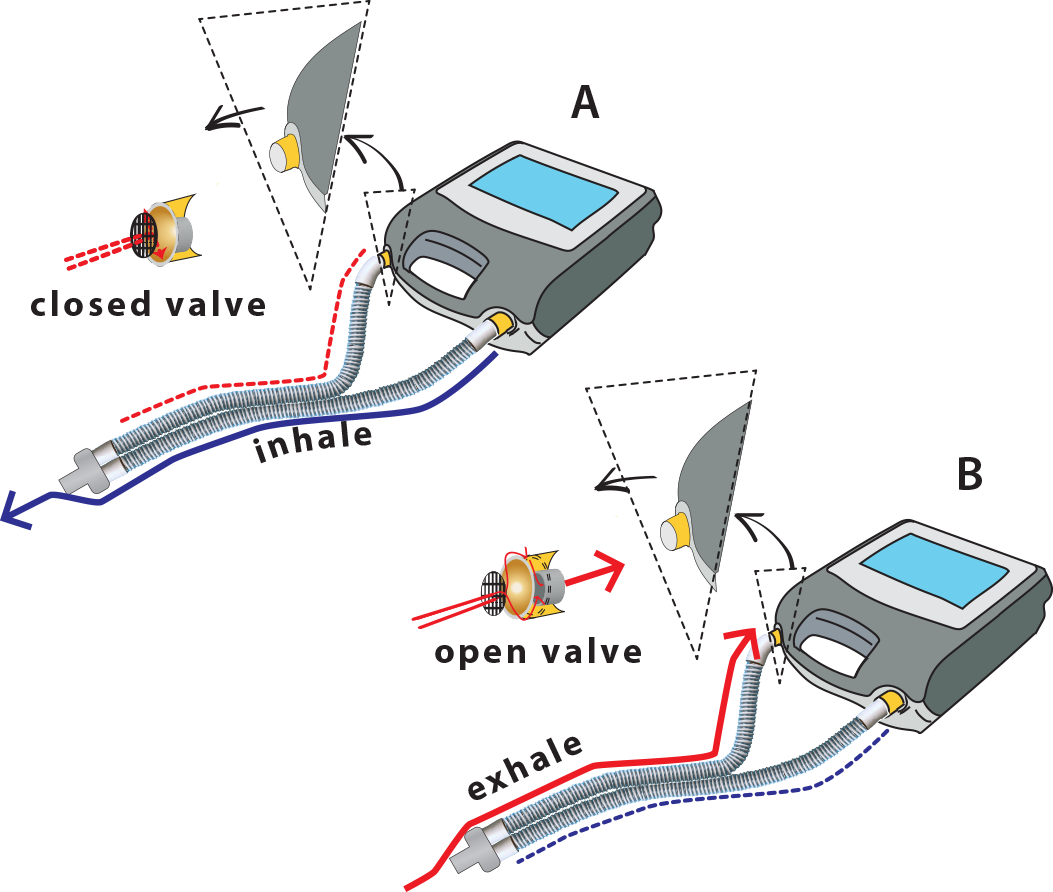
Illustration of how a ventilator valve can be placed on the ventilator hose itself. We also see how a balloon on the valve grows bigger and closes a hole during inhale, while the balloon empties during exhale.

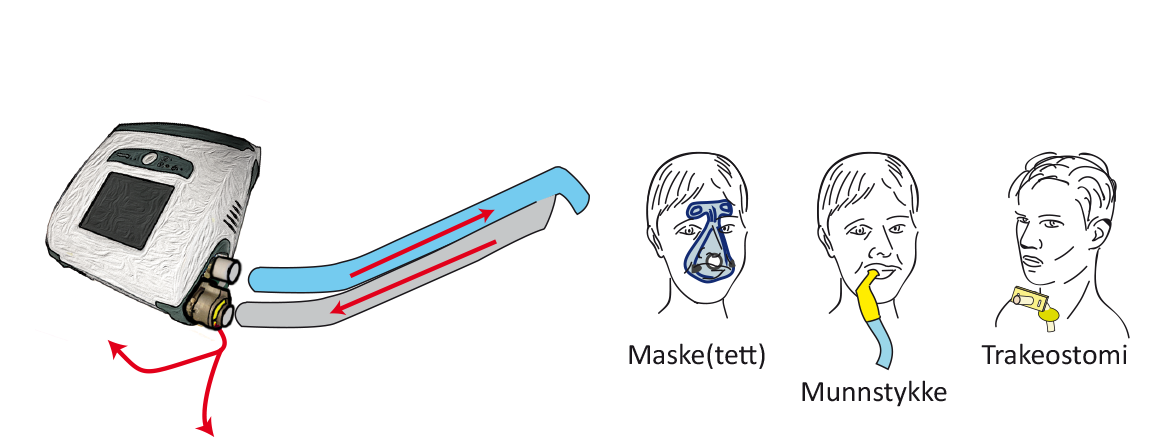
As the figure illustrates, the valve can be an integrated part of the hose and situated close the the user. These types of valves have a balloon or membrane, which blows up or moves to close a hole in the valve, allowing air to dissipate during opening, ie exhalation. In some machines, the valve is built into the ventilator itself. The expired air must be returned to the ventilator before it is expelled in such cases. In order to achieve this, two hoses must be attached to the ventilator, one for inspiration and one for expiration. This is called  a dual-limb circuit.

Image showing Double circuit active valve

Double circuit active valve


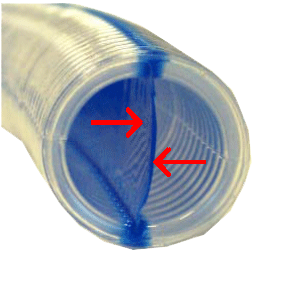
A dual limb circuit may be contained in a single hose with a split membrane, effectively dividing the hose in two separate parts. In one part fresh air from the ventilator passes through the patient and in the other part used air flows back to the ventilator with its valve. Limb-O circuit is such a ventilator tube with a dual-limb circuit in a single hose. See fig.

Most ventilators for home care provided in Norway can also be used without an integrated or active valve in the circuit. In these cases, the ventilator is working like a BiPAP device and exhalation occurs passively through a hole in the mask or the circuit itself. Ventilators with these capabilities may be coined hybrid ventilators, is, capable of performing like a BiPAP device or a "respirator". The advantage of using a BiPAP circuit instead of an active valve is that it is more simple and easy to maintain. The disadvantage is that more air continually flows through the ventilator hose, which could be a problem in terms of humidification. In addition, the ventilator must ‘work slightly harder’ to compensate for a higher leakage of air, which means that the operational lifetime of the internal battery is going to be shorter.

.
I

Connection

Connection sequence: Power supply → ventilator → ventilator circuit → connection (mask, mouthpiece or tracheostomy).


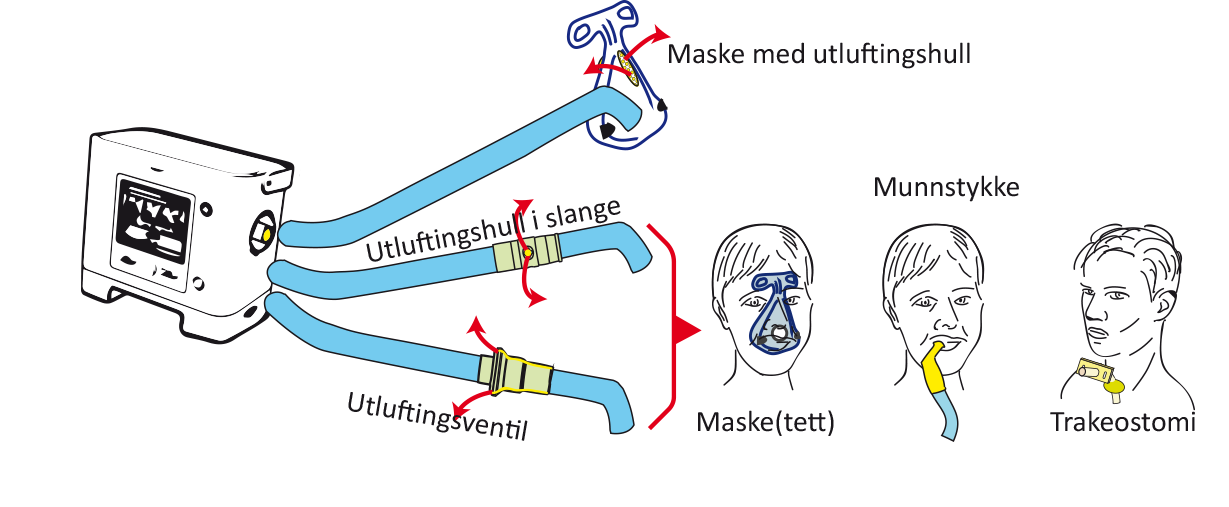
As mentioned, the ventilator circuit can be single or dual, and it can include a valve controlling inspiration and expiration (active valve) or just an open hole in the tube or mask where expired air can leak out (passive valve).

.
Ventilator with passive valve circuit and simple hose.

.Ventilator with active valve circuit and simple hose.

.

Ventilator with built-in valve and double circuit.

On and off

The start button normally only has to be pressed once to start a ventilator (e.g. Trilogy). Sometimes the machine has a standby feature. These machines have a separate main switch, which must be pressed first (e.g. Elisee, Astral, PB560, Vivo 50/60).

Turning off a ventilator always entails a two-step process. Generally, the on/off button must be pressed and then the user will be need to confirm that the machine is to be turned off by either pressing another button (Trilogy, Elisee, Astral) or repressing the on/off button.

Example of how to turn a ventilator on – Trilogy:

  1. Press the on/off button.
  2. Click 'Yes' to confirm.

Alarms

Modern ventilators have numerous alarm options available. What type and how many alarms are activated will depend on the individual patient, e.g. based on his/her breathing reserve. When the therapy is life supporting, immediate assistance is required in case of emergency. Typically, it can take up to 15 seconds for an alarm to sound and it must be possible to solve the problem within one minute. Ventilator alarms are a combination of sounds, light and text in a ventilator display. Every machine is different in this regard, but they are able to react to the same adverse events in general. Critical alarms and medium or low-priority alarms are differentiated.

Important alarm categories:

  1. Alarms indicating low ventilation of the patient may be cause by:
    • leakage/disconnection (critical)
    • blockage (critical)
  2. Power supply alarms may sound because:
    • the ventilator has shifted from a mains voltage to internal battery supply (low-priority alarm)
    • the battery is about to go flat (critical)
  3. Technical alarms:
    • Faulty machine or filter (often critical)

Cleaning

  • Ventilator - general dusting
  • Air filter - clean regularly (every two-four weeks) and replace every six months.
  • Valve - clean regularly. Every two weeks for those with a tracheostomy.
  • Tube - clean or replace. Every two weeks for those with a tracheostomy.
  • Miscellaneous: See Special considerations, using checklists below

Humidification

Tracheostomy patients receive air from the ventilator directly into the air tube (trachea). Therefore, it is an advantage if the air has been humidified and warmed up, as it no longer passes through the nose. It can be humidified and warmed up in the following two ways:

  1. Passive humidification: Via a heat and moisture exchange filter, a so-called ‘artificial nose’. The patient’s expired air passes through the filter, and a small amount of the heat and moisture in the expired air remains in the filter. Some of the heat and moisture in the filter will then be used when the next aspiration starts.
    • Advantages: Easy. The only alternative for wheelchair users in the absence of electricity.
    • Disadvantages: May be insufficient and lead to stickier mucus.
  2. Active humidification: Heating plate with a humidification chamber that vaporises air.  Temperature sensors that register the temperature of the humidification chamber and the temperature close to the patient regulates the temperature of the heating plate. The ventilator tube has heating wires that prevent condensation.
    • Advantages: Gives the best heat and moisture.
    • Disadvantages: Complicated tubing system. Requires electricity from the mains supply.

Carrying out checks/follow-up

Hospital outpatient clinics follow-up ventilator patients and in some cases home visits are made. Ventilator settings rarely have to be adjusted for tracheostomy patients with life-sustaining treatment or those with a stable disease. Ventilator settings and the methods used to obtain the best ventilation might significantly change in line with the progression of the disease if a patient has a disease that gradually changes. Check-ups are mainly carried out at hospital outpatient clinics or departments, but home visits are also useful and in many cases necessary. The interval between specialist check-ups varies and is typically between three to six months. In rare cases, annual check-ups suffice.

Challenges

Home mechanical ventilators are often adjusted in the homes of users who have had breathing problems for a some time and have experience with simpler BiPAP therapy. The main challenge is usually in finding adequate methods that allow respiratory support to be given at various times within a 24-hour period or in different situations, e.g. during the night and day whilst sitting in a wheelchair. Sometimes it is advantageous to have different masks or alternate with a mask during the night and mouthpiece during the day. In order to do this, the ventilator must normally have various settings and tubing circuit.

Special considerations

Safety

Due to the alarms, users or assistants/relatives must always understand the information and act accordingly (see the section on alarms above). Patients who require practically around the clock respiratory support always have two machines. Many users have two machines for practical reasons, e.g. they need respiratory support whilst in a wheelchair or because they need some active humidification during a 24-hour period, but can otherwise manage without.

Checklists

The National  Advisory Unit on longterm machanical ventilation (NKH) has prepared a number of proposals for checklists that could be of practical help to patients with home mechanical ventilation and their daily living.

  1. Training checklist
  2. Daily – weekly- monthly routines
  3. Ordering equipment

Diseases

Various problems can arise in connection with the administration of effective ventilator therapy with the presence of respiratory infections, colds, bronchitis or pneumonia. In general, it is most important to have adequate methods for clearing mucus (see the relevant chapter). In some cases, it might be beneficial to change from a nose to mouth/nose mask. Tracheostomy patients might require more humidification.

Reise med respirator

Traveling with ventilator

Traveling inland 

We recommend that you make a list of equipment that you need on travels when you need comprehensive breathing aid. Particularly important for flights.

Checklist

Booking of ticket. The flight ticket is booked in advance with the local travel company, or you can call the airline directly and order it there. Airlines have fixed procedures for how they can help - and they know the different airports.

What types of information is important to provide? First of all you should inform that you have a disability that means that you need assistance at the gate, to get out to the plane, in the cabin, and that you otherwise need special facilities. If possible, your needs will be taken into account. You will be notified when you book the ticket if your wishes can be met. An example of such information may be:

  • That you depend on a wheelchair
  • That you use an electric wheelchair
  • That you need assistance for luggage
  • That you need assistance out to the plane
  • That you need assistance all the way to your seat
  • That you need to board before other passengers
  • That you need assistance on board the plane
  • That you are using a ventilator
  • If you use portable oxygen equipment, ask your supplier to check if it is permitted to be used on board an aircraft.

Do you have technical aids or electronic equipment you rely on? Electronic equipment radiating electromagnetic energy must not be used aboard the aircraft, as this may affect the electronic airplane systems. If you use technical aids such as a wheelchair, there may be limitations in size, weight and number of wheelchairs included in each flight. If you are using BiPAP or ventilator, you should inquire if you can bring and use this in the cabin or if it is to be sent as a luggage. All modern ventilators approved for life-sustaining treatment are also approved in accordance with the radiation requirement, but the airline may require documentation.

Do you have heart or lung disease? The air on board aircrafts is continually shifted, so even with full airplanes and many people on board there should always be a good indoor climate. On larger aircraft there is also oxygen on board. This oxygen is meant to be used for emergency situations. If you know that you will need oxygen during the flight it is important that you give the airline information about this in good time.

Do you use medical oxygen? If you need to use oxygen during the flight, it is important that you give the airline notice in good time. Some airlines will accept that you include oxygen cylinders approved for use in airplanes, while others require you to use their oxygen bottles during the trip.

The agreement with the airline must be made no later than 48 hours before departure. It is always better nevertheless that such a deal is made when booking the trip. You need to clarify that you need gas bottles with regulator, so you get exactly the dose you need. The bottles are delivered at check-in at the departure point, or they will be pre-assembled on board flights, as it is done for example with SAS (airline). Please note that it is not permitted to use liquid oxygen on airplanes. If you want to use such oxygen at your destination, you will normally be allowed to bring empty containers as checked baggage. For further information, please contact your supplier.

Do you need an assistant? Some airlines offer reduced rates for a necessary companion or assistant. This requires medical confirmation. Do you need medical assistance during the flight? The airline can not take responsibility for providing you with medical treatment or care during a flight. Nor can they give you special medicines that you cannot take for yourself. If you need this type of medical assistance, your journey must be classified as a medical transport. There are special routines for medical transport.

  • Check out show times in advance
  • Calculate good time
  • Inform about your needs
  • Are you unsure, just ASK
  • Remember, you are a customer!

On board the plane. Provide information to cabin staff about what you think they should know. Find or ask for a space at the aisle, so you will get easier contact with the flight crew when you need help or if you have any questions.

Mobility impaired. For the flight itself, some provisions apply by international and national authorities. They include flight safety and routines in case of emergencies. The rules do not include disabled people as a group, but make demands on people with disabilities. This means that you can not sit on the seat at an emergency exit. For those who are mobility impaired, the flight can be somewhat uncomfortable. If your wheelchair is equipped with a seat cushion, you can use it in the airplane as long as it does not prevent the use of a safety belt. Then you are more comfortable and steady. There are also pillows and blankets on board that can give you support.

Toilet visits can be difficult for disabled people on flights. Work is being done to develop transport chairs that will make the situation easier for some users. Some new aircrafts are now being built with a larger toilet. These are in front in the aircraft.

Travelling abroad

All technical respiratory equipment that is used in Norway is permanently borrowed and belongs to the hospital unit for assistive devices. In the event of technical faults or breakdowns, the unit is responsible for servicing and providing replacement devices. However, such responsibility is limited to domestic travel. Therefore, it is crucial to plan well when travelling abroad. For safety reasons, the specialist in charge should be consulted to discuss which additional equipment is required. A spare ventilator should always be taken along, as it could be fatal or health damaging if the ventilator breaks down. In some cases, it might be relevant to borrow an extra machine. A list of resource persons and organisations in various countries is available on the American web site of the International ventilator Users Network , which can be downloaded as a pdf.

Test your knowledge


Problems with coughing and secretions

In this chapter you will learn about:

  • the excretory system of the lungs;
  • the characteristics of an effective cough;
  • various breathing techniques;
  • cough assist;
  • cough assist machines;
  • other measures such as humidification, aspiration and suction.

At the end of the chapter, you will be given some tasks to complete.


Excretory system of the lungs

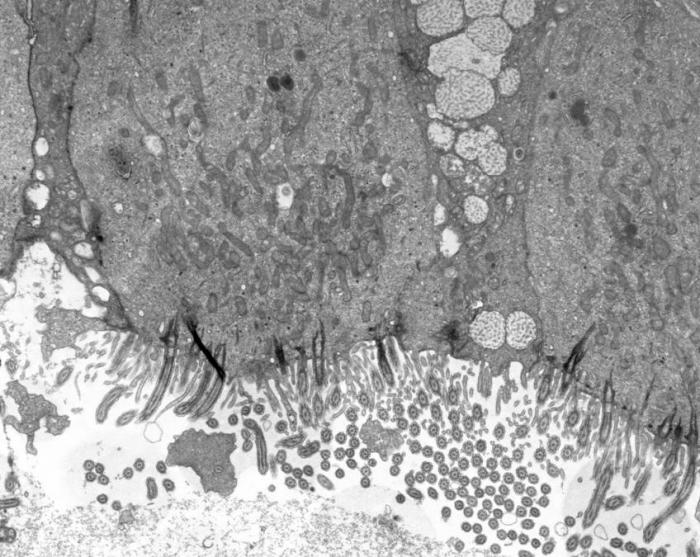
Airway secretions, cilia and effective coughing are important parts of the excretory system of the lungs. Dust and particles in the air that are breathed in do not belong in the lungs where gases are exchanged. Airway secretions that line the airways shall therefore capture the particles to facilitate transportation to the pharynx and out of the lungs with the aid of cilia and coughing.

.

Electron microscopic image (x 10,000) of cilia. Foto: EM-lab, Universitetssykehuset Nord-Norge.


Remember that:

  • The activity of cilia is stimulated by good pulmonary ventilation.
  • An effective cough further transports secretions and expels them from the lungs.

You can learn more about good pulmonary ventilation, breathing techniques and effective coughing on the following pages.

Effective coughing

An effective cough is a coordinated and powerful cough that moves mucus in the airways.

A good cough involves the following elements:

  1. Deep inspiration to fill the air with lungs.
  2. Containment of the air by the throat muscles.
  3. Pressurisation of the air with the aid of the stomach muscles.
  4. Opening of the pharynx with rapid exhalation of air out of the lungs.


How do I know if coughing is effective?

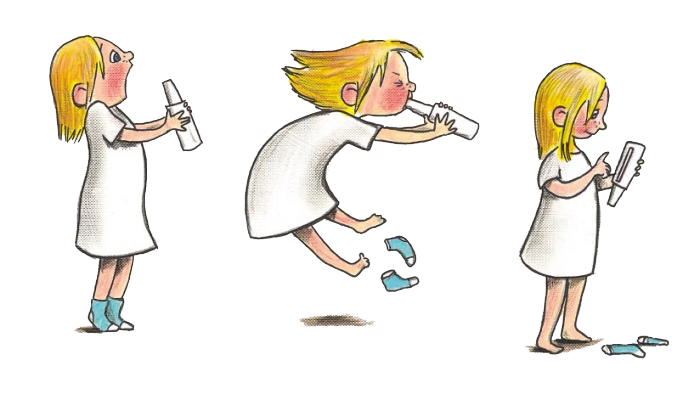
The subsequent strong air flow sweeps mucus and airway secretions up the pharynx and out of the lungs. We can measure the air whilst coughing to find out whether the cough creates a sufficiently strong airflow. This is called the Peak Cough Flow or cough PEF (peak expiratory flow). For healthy adults, it should be 270 l/min and at least over 160 l/min to move mucus.

.
Illustration by Hege Bø. www.naaf.no

Breathing techniques

Various techniques can be used to assist deep aspiration to produce enough air. The techniques are described below.

Air stacking

Air stacking involves active inspiration of air several times without expiration in between until the lungs are filled with air. Another variant is the use of a mask with a one-way valve that only facilitates inspiration (not expiration). The technique is best suited to those who have quite strong respiratory muscles.

Frog breathing

Frog breathing involves stacking air into the lungs using the pharyngeal muscles. The technique can be a good choice as it does not require an assistive device. See the video of Jørgen demonstrating frog breathing.


You can also read more about the technique 

.

Deep inspiration with a cough assist machine

Cough assist machines are used to fill the lungs with air. The air is not exhaled again, as with normal usage of a cough assist machine. See the video demonstrating how Jørgen uses the machine.


Air stacking with the aid of a bag

With the aid of a ventilation bag, several portions of air are stacked without expiration in between. You can use the bag yourself or get a helper to assist. See the video demonstrating how Martin stacks air with the aid of a bag.


Air stacking with the aid of a ventilator

The same technique for a bag is used, but a breathing machine is used to stack several portions of air upon aspiration without expiration in between. The breathing machine must be set to allow air stacking. See the video of Jørgen demonstrating the technique with his breathing machine.


If these techniques allow you to breathe more deeply and draw in more air, you will also notice that you have more air with which to cough.

Cough assist


Do you know how to get enough force behind the air to move secretions upon expiration? Firstly, you need a large amount of air in your lungs (see the section on breathing techniques). Many people also need additional cough assistance. Several techniques could be used. We will now describe manually and mechanically assisted coughing.

Manual cough assist

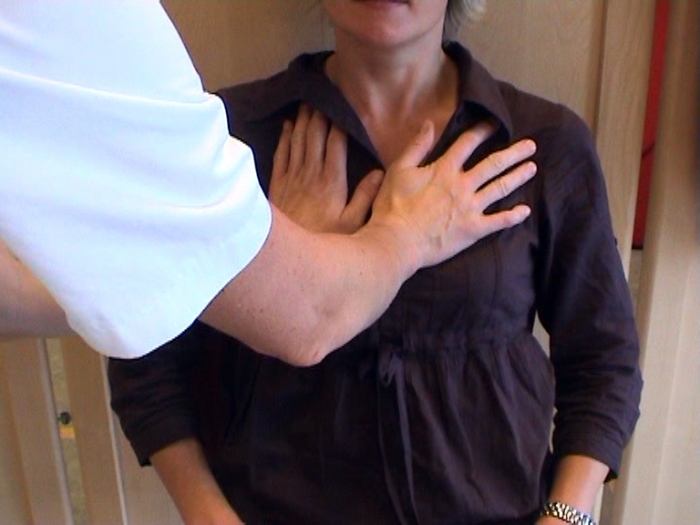
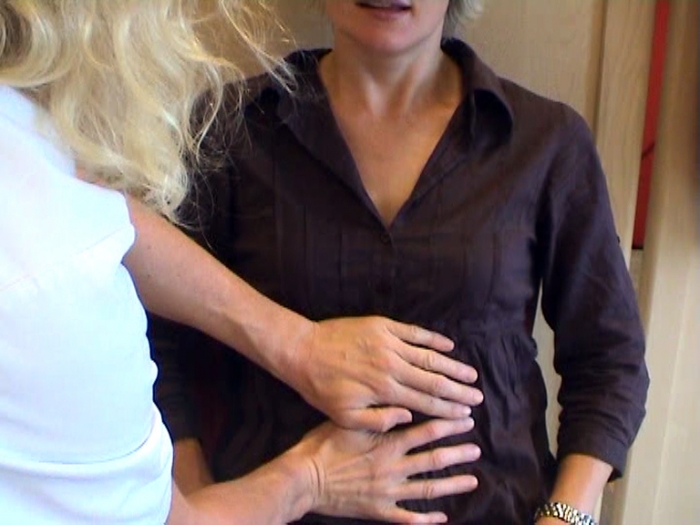
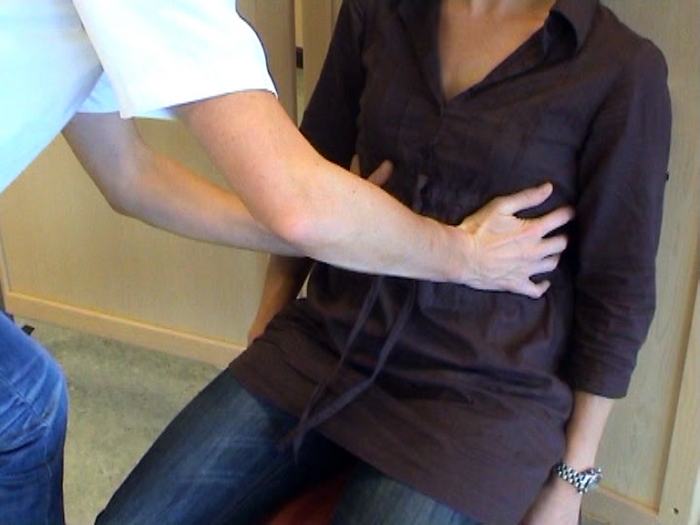
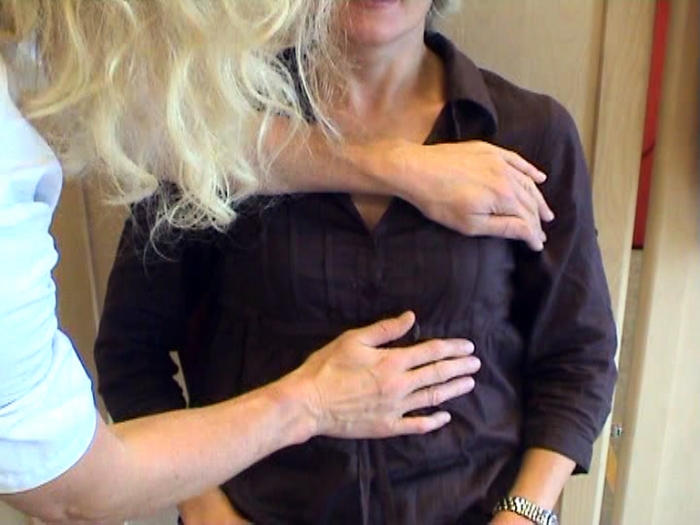
A helper puts pressure on the chest or stomach, or a combination of the two, at the same time as you cough. The images below show some suggestions. Along with your helper, you can find out what works for you.

.
A helper puts pressure on the chest with both hands.

.
A helper puts pressure under the chest.

.
A helper puts pressure on both sides of the chest.

.
A helper puts pressure under the chest with one hand and over with the other hand.

Image/Source: NKH with T. Andersen/B. Hov

Mechanical cough assist

Performed with the help a ‘cough assist machine’. The technique is called mechanical insufflation - exsufflation (MI-E). This means that a machine will give you a deep aspiration with the help of positive pressure followed by a deep expiration with negative pressure. A rapid change from positive to negative pressure simulates and supports a strong airflow in the same way as a normal cough. The therapy can be administered via a mask, mouthpiece or tracheostomy.


Source: Philips Respironics.

See the video of Jørgen receiving therapy with a cough assist mask.


Equipment

In Norway, Cough Assist 3200 and Cough Assist E70 are the most used machines for coughing assistance.

E-learning

Health personnel and others who will be learning how to operate the settings and use mechanical coughing assistance can go straight to the e-learning programme (for each machine) to learn more. You will also find instructions on how to clean the equipment.

.

Cough Assist E70

To the e-learning programme (only in Norwegian.)

How to assemble and clean the equipment

Assembling the tubing set.


Cleaning the equipment.

Additional measures

Respiratory support, the right techniques for coughing and pulmonary ventilation give less discomfort with mucus in the airways. Additional measures might be necessary with a considerable amount of or sticky mucus. Here are some examples.

Humidification with respiratory support

Some machines have an integrated humidifier, whilst others require an external one. You can read more about this in the chapter on ventilation support.

Inhalations

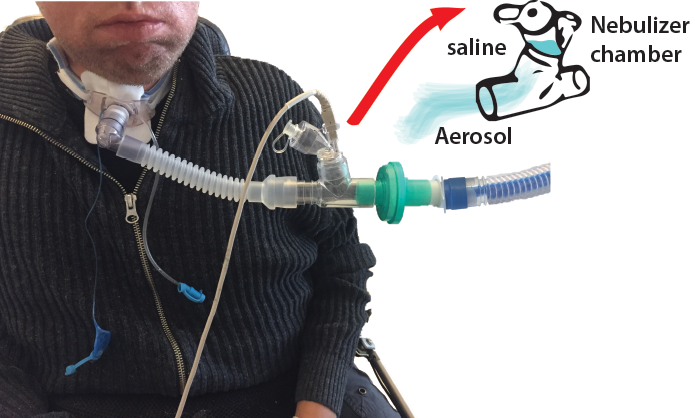
Inhalations can be performed via a separate nebuliser connected to a respiratory assistance machine’s tubing circuit. Medications administered via inhalation aim to treat conditions in the airways or change the stickiness of the mucus. If you use inhalation medications that open up the airways and loosen up mucus, it might be beneficial to start with inhalations before using other the techniques to aid deep breathing and effective coughing. If you use steroids or inhaled antibiotics, you might benefit from inhaling these after coughing to ensure that the lungs and airways are mucus-free.

Patient and Nebulizer connection

Nebulizer


Suction 

Suction might be necessary, especially for those with a tracheostomy, as it is important to completely expel the mucus. You can read more about this in the chapter on tracheostomies.

Test your knowledge

Nå har du lært mye om hoste- og sekretproblematikk. For å se hva du har fått med deg skal du få svare på noen spørsmål. Lykke til!


Mask therapy

Important to know about mask therapy

  • Put the mask on correctly and make sure it fits well to avoid leakage around the mask and pressure sores.
  • Learn about complications and preventing them.
  • Learn how to assemble and disassemble masks and head straps.
  • Learn the cleaning routine for the mask.
  • Learn how to find the written instructions for the applicable mask and cap/straps.

Masks in general

A good mask might be the most important factor for the success of BiPAP or home mechanical ventilator therapy. Masks must be adapted to the individual and masks are selected in cooperation with the user. The mask must feel comfortable on the face and not rub or cause any pressure. There must not be excessive leakage around the mask. This can result in problems with dryness in the nose and mouth or irritable eyes. Significant leakage can also lead to breathing that is out of sync with the machine, which comprises the effect of the therapy. Avoid any discomfort that could disturb sleep at night.

Most of the factory-made masks currently on the market are made of silicon or gel.

The durability of masks depends on maintenance. Normal consumption is two masks per year. Users who also have mask therapy during the day, should have two different masks to vary the pressure on the face. This can reduce the risk of complications.

There are two main types of masks: masks with exhalation ports for expiration (vented) and masks without such holes (non-vented). It is important to know the difference between these masks and how to use them correctly.

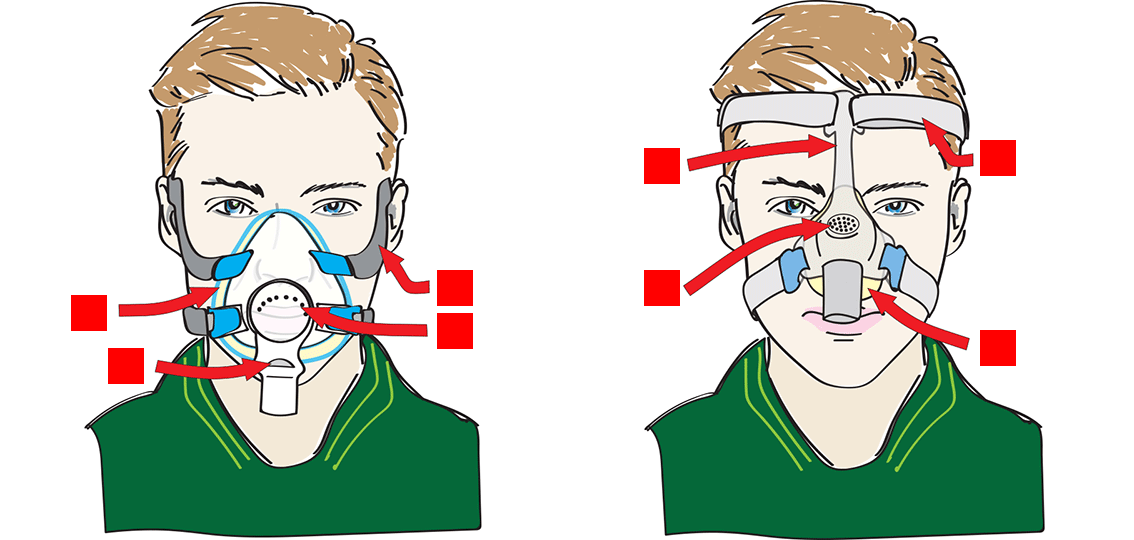
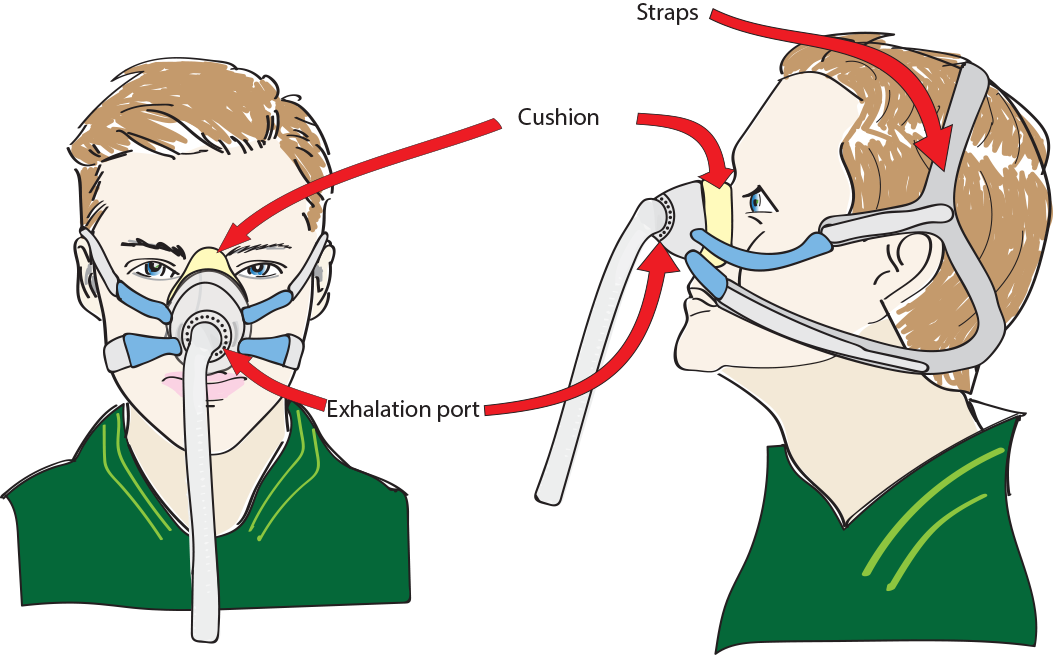
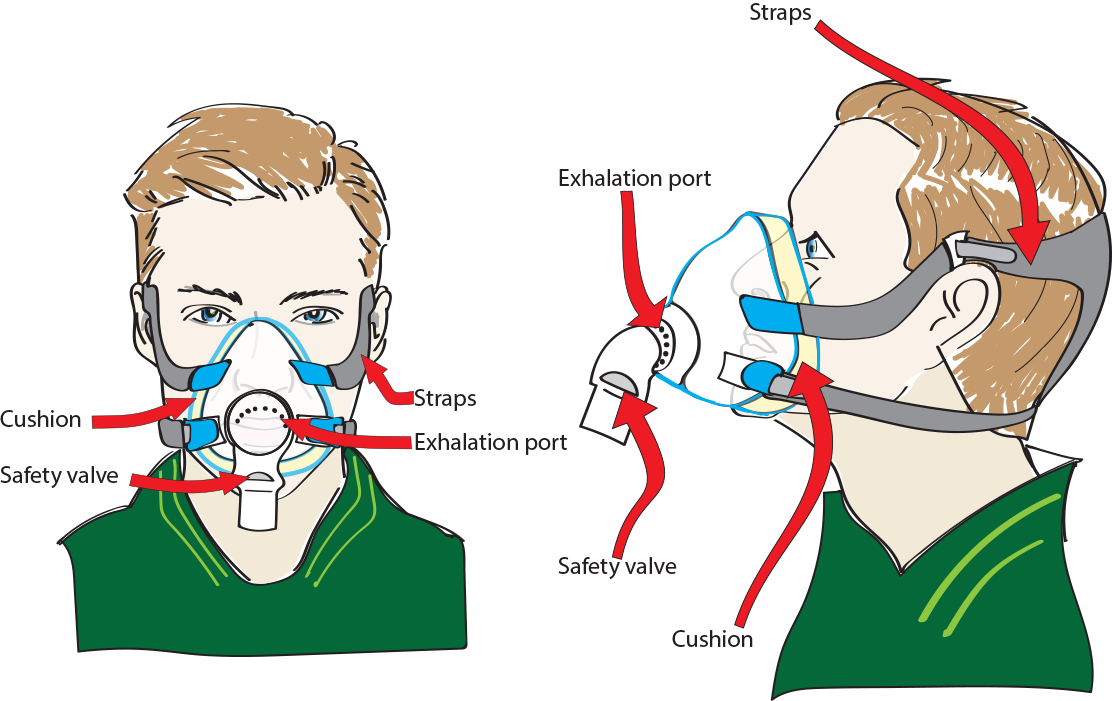
Click on the parts of the masks to learn their names


.

Masks with holes: BiPAP masks (vented mask)

  • The mask has a built-in exhalation port (hole) to expel the air from the lungs out of the mask. This is to prevent re-aspiration of ‘used air’.
  • The hole/opening for ventilation is placed in the ’elbow’ or mask shield.
  • Thorough washing of the mask is essential to prevent the holes from becoming blocked with dirt.
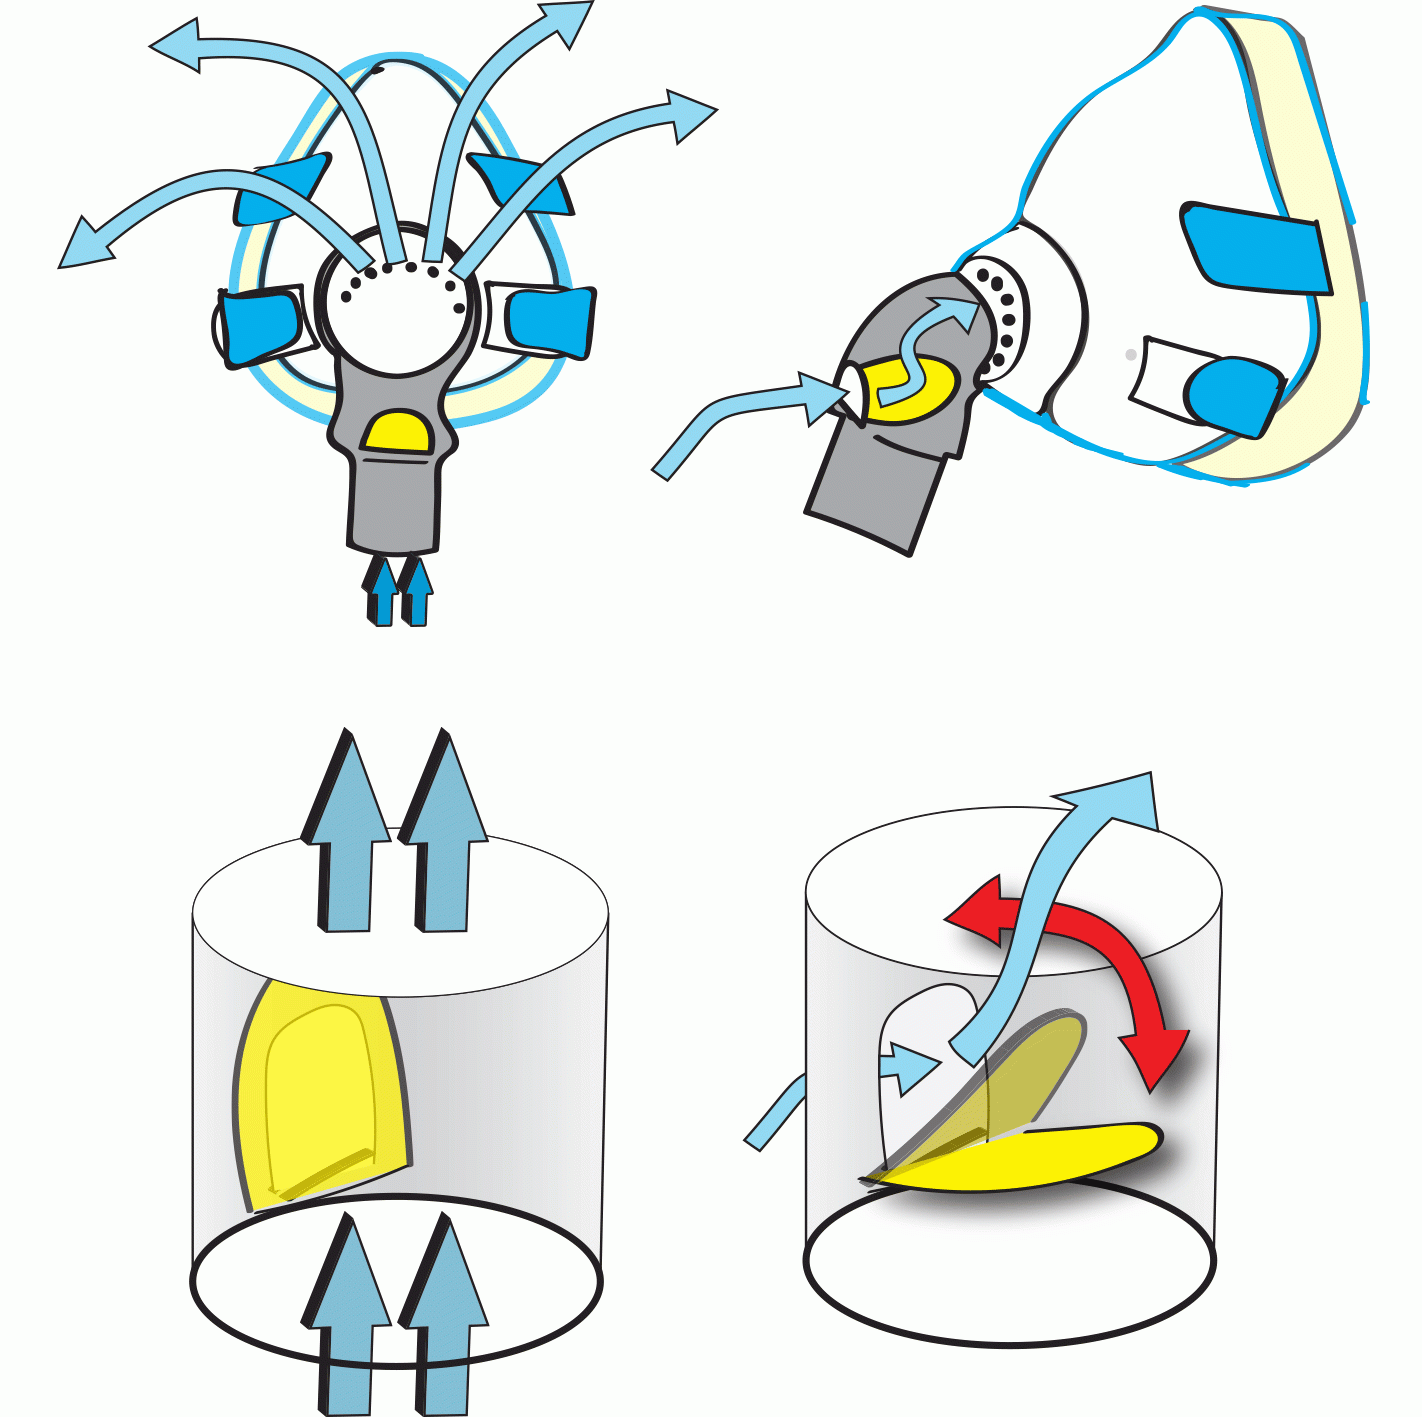
  • All masks that cover both the mouth and nose also have a safety valve (see below).


.
Safety valve

Masks without holes: Ventilator masks (non-vented)

  • These are tight-fitting masks without exhalation holes.
  • The valve for controlling exhalation is placed in the ventilator circuit or the ventilator itself.
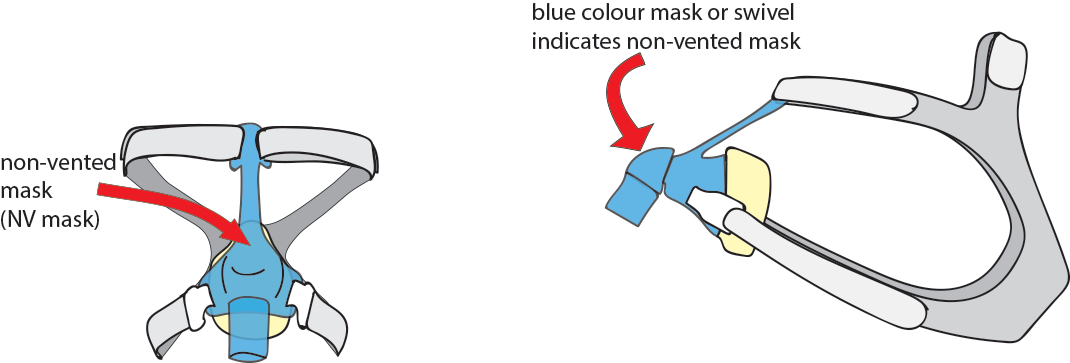
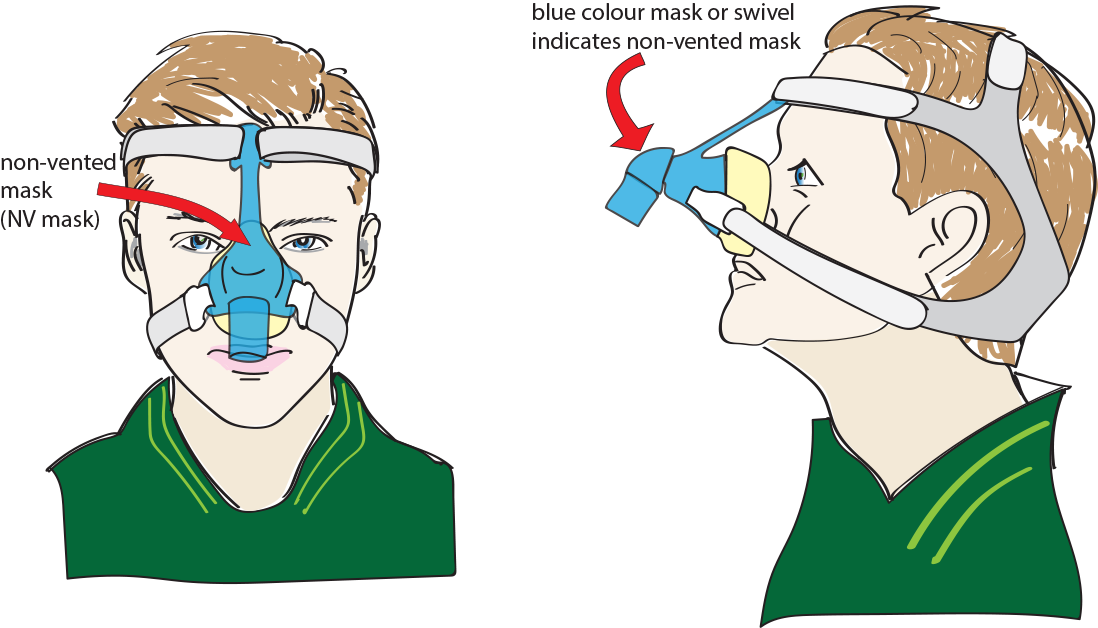
  • A blue ‘elbow’ often indicates a non-vented mask:

Image displays  two non-vented maskes
Ventilator masks (non-vented)

Choosing a mask

Different types of masks and which to choose

When choosing a mask it is essential to consider the individual diagnose, level of physical function, age and whether assistance will be needed to put on/take off the mask. Masks must be chosen in consultation with the patient after testing various alternatives. Several types of masks are available: Masks that just cover the nose, masks that cover both the mouth and nose, face-covering masks or masks that are used on/in the mouth.

Masks that cover the nose

Nasal masks

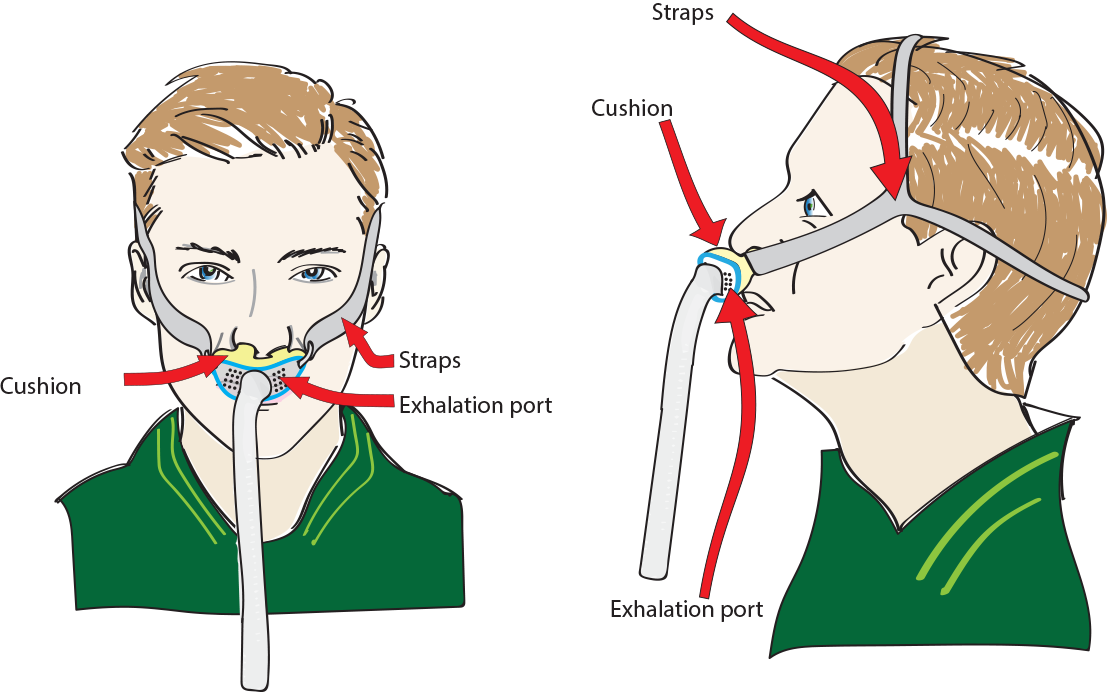
Nasal masks are often the first choice. Many different types of nasal masks are available, both with and without exhalation ports. A blue elbow usually indicates non-vented mask. Some masks have a replaceable elbow. Some examples:

Person with nasal mask with descriptions

Nasal prongs


.

Non-vented nasal mask for use with either active valve circuit or separate, disposable passive valve.


Specially molded nasal masks

Nasal masks can also be customized, specially molded. This can be done as a last option if factory-made masks cannot be used. Molded masks are tight fitting without exhalation ports. Therefore, it is necessary to use exhalation ports in the circuit between the mask and tube when using this type of mask with BiPAP therapy.

.

Customized mask.


Nasal prongs

Several types of prongs are available. All have exhalation ports and are therefore used with BiPAP therapy and less commonly with a "respirator" circuit. Some examples:

.
Neseproppmaske

About nasal masks and nasal prongs in general


    • The user must be able to breathe with a closed mouth to obtain the best possible effect from therapy (avoid ‘gusts’ due to pressure being expelled through the mouth).
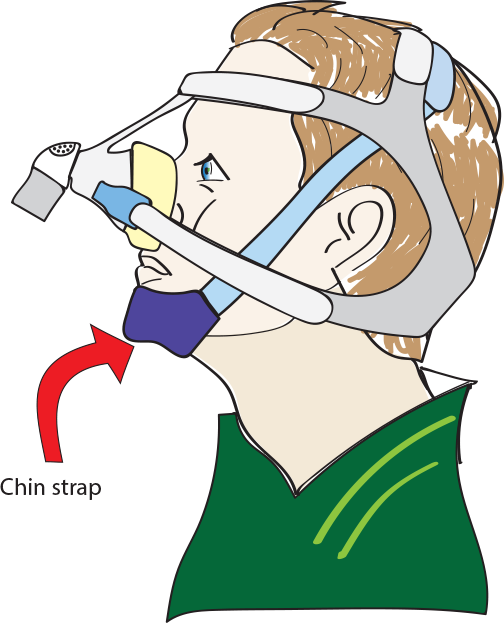
    • The mask can also be combined with a chin strap in the event of leakage from the mouth.
    • The masks are small:
      • Reduced risk of pressure sores,
      • Reduced feeling of claustrophobia.
      • The mouth is not restricted (one can talk/eat).
    • Spectacles can also be worn when using a nasal mask during mask therapy.

.

Masks that cover both the nose and mouth (oronasal)

Masks that cover both the nose and mouth may be appropriate in heavy mouth breathers and cases of permanent tight nose passage. These masks are also available with/without exhalation ports. A blue elbow indicates a non-vented mask. Some masks have a replaceable elbow.

All oronasal masks that have exhalation ports also have a safety valve, commonly placed in the elbow. This is an additional and wide hole in the mask, with a ‘silicon flap’ acting as a valve to open or close with air flowing into the mask. If the machine stops, the valve opens and room air can enter the mask,avoiding rebreathing, that is inhaling used air from a closed circuit.

The head straps are available in various sizes. They must not be too large. If they are, it will be difficult to tighten them properly.

.Oronasl mask


Total-face masks


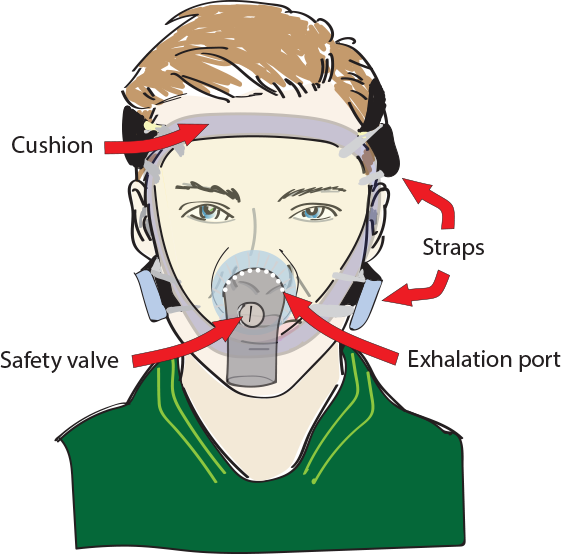
Total face masks are not normally the first choice. They are mainly used temporarily to relieve pressure sores on the nose. They do not touch the nose and therefore provide good relief. Despite covering total face they do not cause ‘gusts’ in the eyes, but there might some slight fogging (especially when using humidification on the machine). As a result, it might be more difficult to look out of the mask. Therefore, they are more suitable as a ‘night mask’.

.

Total-face mask


Oral mask and mouthpiece

Oralventilation is an alternative for the relief of pressure sores. Problem may be increased risk of vomiting, dryness of the mouth or the secretion of saliva.

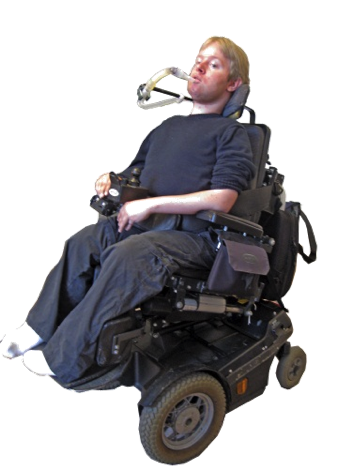
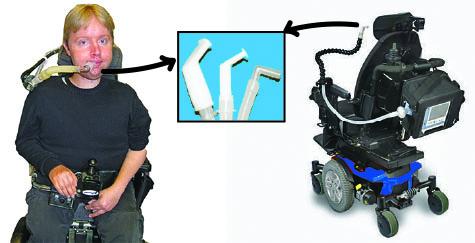
A mouthpiece can be a good alternative when daytime therapy is needed. As such, the patient will not have to wear a face mask 24 hours of the day. It is also convenient in a wheelchair and for airstacking procedure.The mouthpiece can be attached to an arm, e.g. on a wheelchair, and the patient can take a ‘sip of air’ from the mouthpiece when necessary. In order for it to work, the patient should have enough muscle power in his/her lips, so he/she can tighten his/her lips around the mouthpiece upon aspiration.

.
Oral mask

Munnmaske
Jørgen with his mouthpiece

.
Jørgen using mouthpiece ventilation in his wheelchair. Different choices in mouthpiece size and angle, attachment to wheelchair etc.

Fitting the mask

Importance of having the correct type of mask and size

  • During the initial fitting, the user will try various masks to find the one most comfortable for him/her.
  • A stencil/size chart is available for most masks, which can be a help when finding the right size.
  • The mask must fit well and feel comfortable.
  • It must not pinch the nostrils together and the pressure should be evenly distributed across the face.
  • Most masks are now supplied with a guide on how to put the mask on the face and techniques for proper tightening of the straps to prevent leakage and pressure.
  • Many demonstration videos can also be found on YouTube and mask supplier web sites. See the examples below under Mask instructions and videos.

Headband

Some masks have a headband. This is to reduce the pressure on the bridge of the nose and to stabilise the mask on the face.

  • The headband is adjustable on many masks
  • Start with as much angulation of the headband as possible. This provides the best pressure relief on the bridge of the nose. Adjust it inwards if air leaks into the eyes.
  • Adjust the straps after adjusting the headband.

Mask straps/cap

The straps of the mask/cap must also be the correct size to obtain the right tightness and to prevent the straps from chafing.

  • Make sure the straps do not cause irritation near the ears:
    • The ears must be free.
    • The straps must not rub above or below the eyes.
  • Adjust the mask straps (if applicable) after the machine has started and the patient is comfortable in bed.
  • Use your hands to check for air leakage around the mask. Adjust as needed.
  • Pay particular attention to leakage around the eyes. This must be avoided, as it will cause red and sore eyes.
  • Tighten the mask straps as little as possible - just enough to allow the mask to fit snugly. It should be possible to put two fingers under the straps after the mask has been tightened. It must be tightened the same on both sides, so the mask is not crooked on the face.
  • If the mask has a double-layer cushion, it should be lifted slightly off the face to allow the space between the layers to fill with air after the machine has been turned on. This will form an air-cushion against the face, which counteracts air leakage and reduces the need to tighten the mask.

Skincare

  • The user’s face must always be washed before putting the mask on. Avoid using skin creams.
  • The user’s face might be marked after wearing the mask throughout the night, but marks should disappear quite quickly (30-60 minutes) after the mask has been removed.
  • After removing the mask, wash the user’s face and preferably massage the skin with skin cream.
  • If there are signs of soreness (redness and tenderness), request a change of mask.

Mask instructions

Written instructions for use are available for all types of masks. These are found in the package with the new mask. Always read them for excellent tips and advice on fitting and maintaining your mask!

Some manufacturers have also made films about the various masks on their website. The films show how one puts on the mask, tips and advice to avoid mask leakage and washing and maintenance of the mask. You'll find company name for the particular mask on the mask's packaging or by asking the healthcare professionals that helped you to customize the mask. It is also possible to find such films by searching the machine's name on YouTube.


Preventing complications

Preventing complications

Various complications can arise in connection with the therapy, but they can be prevented with these tips.

Preventing leakage around the mask

Pressure sores on the bridge, cheeks or forehead are one of the most common complications. This happens when the straps are tightened too much to prevent leakage from the mask. Ensure the following:

  • That the mask and straps are the right size and comfortably tight.
  • For masks with a two-layer cushion: ensure that the outer layer is not crimpled by lifting the mask of the face, so enough air gets between the two layers after the machine has started.
  • Newly washed mask! (See cleaning).
  • Wash the mask before putting it on the face.
  • Avoid using skin creams.
  • Moustaches/beards often lead to leaks!
  • It is very rare for a mask to maintain a full seal throughout the night. Some slight leakage often occurs when turning in bed. This does not generally cause a problem.
  • Nonetheless, avoid leakage to the eyes, as it will irritate the eyes making them red and sore.
  • Avoid tightening the straps each time the mask has some slight leakage - try moving it slightly on your face.

Preventing pressure sores

A comfortable mask is essential.

  • It must not pinch or press the nostrils together.
  • Try to tighten the straps as little as possible.
  • The straps must not rub the skin.
  • The ears must be free of pinching and rubbing.
  • Always replace the mask with sores start developing! Contact the health personnel who fitted the mask.
  • Try nasal pads/Comfeel if sores start developing on the bridge of the nose.
  • Hapla felt (thin felt with adhesive on the back) can be cut to size and affixed to the mask if the skin reacts to the materials of the mask. Other types of soft fabric can also be used to protect the skin.
  • Have two different masks. These can help relieve pressure. Users who use masks almost around the clock should have several different masks to vary the pressure points on the skin.
  • Good skin care is essential when taking off the mask – skin creams during the day, as needed (if not using a mask).

Blocked or runny nose?

Some people experience a blocked or runny nose through using a mask.

  • Nasal sprays can be used for a short period of time with a cold. Normal saline (NaCl 0.9%) can also be used to flush the nose if one is prone to having a blocked nose.
  • Masks that cover the mouth and nose are the best option for chronic nasal problems.
  • A humidifier connected to a BiPAP/ventilator heats and gives moisture to the therapy air. This will often remedy problems with a blocked or runny nose.

Leakage around the mouth?

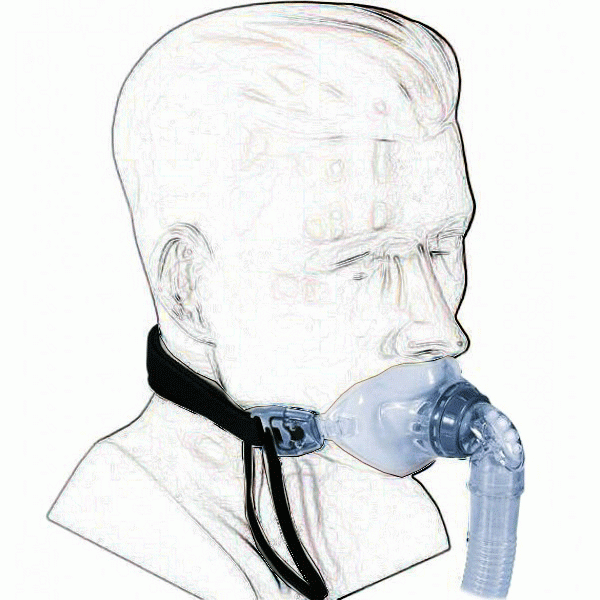
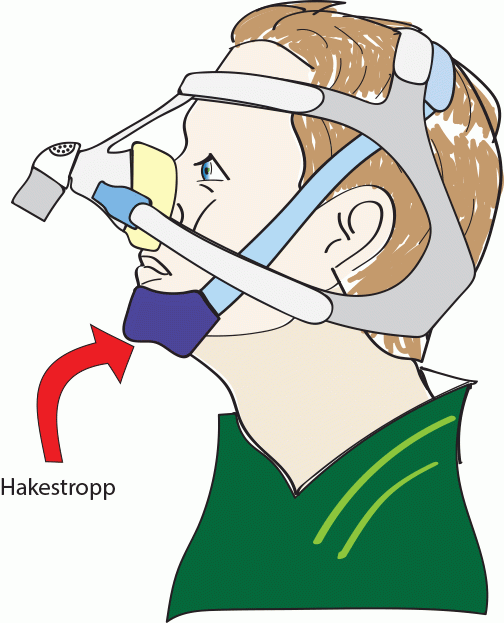
  • A chinstrap can help if there is a problem with the mouth slipping open when asleep. There are different types of chinstraps. The strap is placed under the chin and is suitably tightened and attached to the top of the head. This prevents the mouth from opening with a fully relaxed jaw, but it must still be possible to open the mouth when using one’s muscles.


.
A mask that covers the mouth and nose, with a chinstrap

  • Change to a mask that covers the mouth and nose if a chinstrap does not help.

In the event of flatulence

If an extremely high therapy pressure is needed from the machine, some people might develop flatulence. This is not dangerous, but can be uncomfortable. Flatulence can be avoided by:

  • a change in sleeping position:
    1. a side position
    2. or raised head?
  • Contact the doctor in charge of the therapy. Possible measures could be medications that reduce acid production or strengthen the sphincter muscles in the oesophagus.
  • Change the settings on the machine (in some cases).

Dental problems

Mask usage can also lead to sensitive teeth, gums or jaws, or make existing dental problems worse, especially if the bottom straps on the mask are excessively tight.

  • Try loosening the straps slightly. With substantial leakage - contact the health personnel to replace the mask.
  • If symptoms persist, contact a GP or dentist.

Observations


Cleaning

The mask must be gently washed each day and thoroughly once a week. Wash the straps as needed – preferably once per week.

Daily cleaning

  • Wash any skin oils and debris deposited on the mask, both inside and out. Use a mild detergent, such as washing up detergent, etc., (do not use detergents containing alcohol, fabric softener or moisturising cream).
  • Rinse well and dry.
  • Inspect the mask.
  • If the soft mask cushion is stiff or torn, or if any part of the mask is damaged, it must be replaced.

Weekly cleaning

  • Disassemble any loose pieces on the mask. See the instructions supplied with the mask.
  • Wash the parts in warm soap water - use a mild detergent, such as washing up liquid, etc., (do not use detergents containing alcohol, fabric softener or moisturising cream).
  • Use a soft-bristled small brush to clean the valve openings.
  • Rinse off all soap and thoroughly dry the parts before re-assembling the mask.
  • The head straps must be hand washed in warm water with mild soap. Rinse well and air dry

Mask instructions

Written instructions for use are available for all types of masks. These are found in the package with the new mask. Good assembly/disassembly illustrations are available for masks that need to be dissembled prior to cleaning. Pay close attention to them to ensure that the mask is washed as good as possible! Some examples are found below of various masks that can be disassembled.

Some manufacturers have also made films about the various masks on their website. The films show how one puts on the mask, tips and advice to avoid mask leakage and washing and maintenance of the mask. You'll find company name for the particular mask on the mask's packaging or by asking the healthcare professionals that helped you to customize the mask. It is also possible to find such films by searching the machine's name on YouTube.


Test you knowledge


Tracheostomy

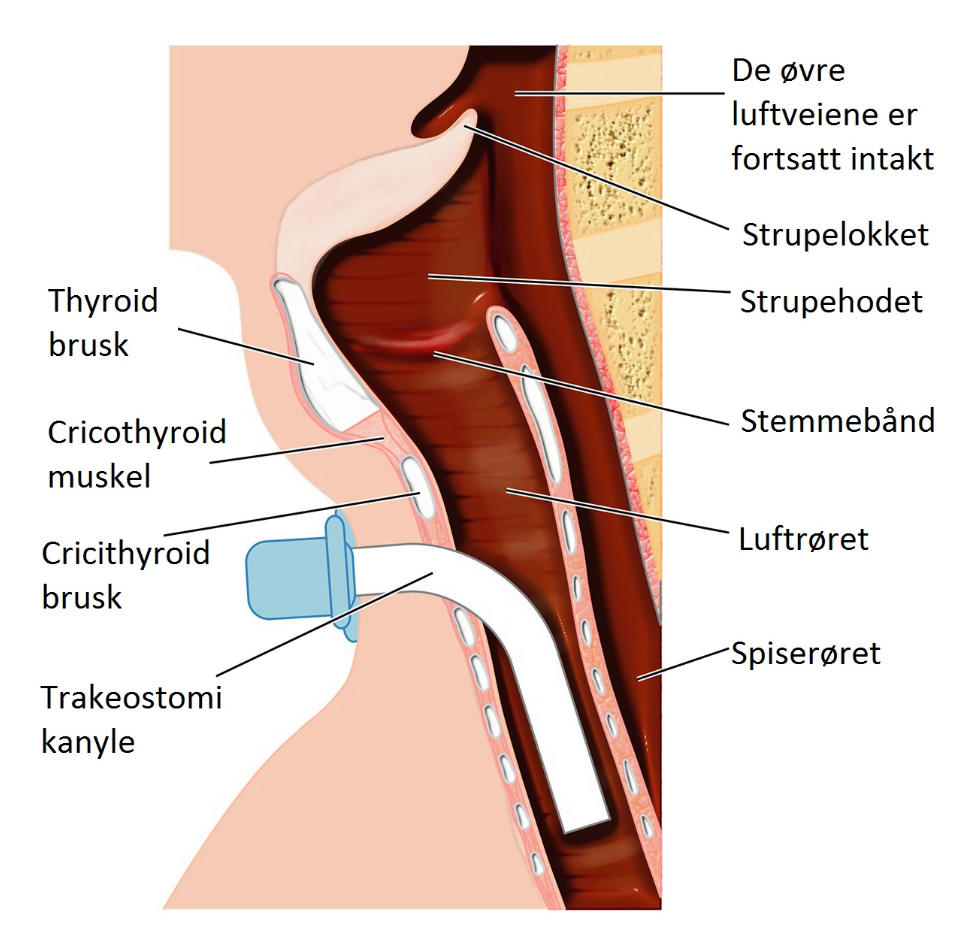
With a tracheostomy, respiratory support is provided through the connection of air from ventilator to a tracheomstomy cannula. A tracheostomy cannula is a plastic tube which passes through a hole in the throat and enters into the trachea. Ventilation provided by this techinique is called invasive mechanical ventilation therapy, as opposed to non-invasive therapy, e.g., mask therapy.

.

Indications


Why do some people need a tracheostomy (invasive treatment) and when should it be performed?


  1. Some types of respiratory failure increase the need for respiratory support. When ventilatory support is critical, mask therapy could be less safe ande even more cumbersome than invasive treatment. Choices depend on individual preferences. To some patients 24/7 nonivasive treatment is preferable, but others may prefer a tracheostomy even when ventilatory support is required for more than 16 hours during a 24-hour period. Advantages and disadvantages need to be discussed with each patient.


The upper airway muscles of some patientse may be weakened, causing problems with swallowing and keeping the airways open or free/ protected from aspiration. Mucus and residual food could enter into the trachea and lungs with the subsequent risk of breathing problems and pneumonia. Weakened upper airway muscles can also lead to airway collapse, especially when sleeping. If these problems cannot be solved in any other way and mask therapy is difficult, a tracheostomy could be a potential solution.

Some experience an increased problem with mucus in the airways, This could be caused by reduced ability to cough effectively, problems with swallowing or more proneness to mucus production due to a lung disease. If these problems cannot be solved in any other way and mask therapy is difficult, a tracheostomy could be a potential solution.

If a user has persistent hypoventilation despite optimal mask therapy, a tracheostomy could provide improved ventilation.


Advantages of a tracheostomy

  • Can be life-saving.
  • Can give a better quality of life than mask therapy in some cases.
  • No face mask is required.
  • Less problems with leakage.
  • Direct entry of air to the trachea and lungs:
    • Mucus can be removed more easily.
    • Safe and easy to ventilate patient.

Disadvantages of a tracheostomy

  • Increased risk of infection, haemorrhaging and scar tissue.
  • Natural humidification, heating and filtering of air is lost.
  • Invasive surgery is required.
  • One has to live with a ‘hole in the throat’.
  • The ability to swallow and speak may deteriorate.
  • The ability to taste and smell can change.
  • Caregivers require more training.
  • More technical equipment is needed.

About training and preparedness at work

An assistant’s story: Cassandra

Why and how?

Deciding whether to have a tracheostomy is often quite a difficult task. The introduction to the chapter provides an overview of the most common situations when a tracheostomy might be needed. Normally, there will be plenty of time to make such a decision. It is best to gather information, discuss the matter with those experienced in such treatment and make the right decision with those in charge of the treatment. A tracheostomy can then be planned. Sometimes a tracheostomy might be done due to an acute disease when invasive mechanical ventilation therapy is necessary in an emergency situation. The objective is to establish open airways, prevent infections, remove mucus and reduce the risk of chronic infection in the lungs.

.

Observation

Initially, after tracheostomy is performed it is important to observe whether bleeding from the stoma (hole in the throat), swelling or pain occurs. This may be quite normal. Once the stoma is stable, usually within 2 weeks, a tracheostomy tube change may be performed. It is necessary to look out for any signs of infection, such as sores, pus, swelling, granulation tissue, increased amount of mucus, and whether the cannula is positioned correctly in the throat and that the tracheostomy tape is comfortably tight.

Complications

Acute complications associated with a tracheostomy are rare Severe haemorrhaging or air leakage to the area between the lungs and walls of the chest or the area between the lungs or subcutaneous tissue can occur, therefore careful monitoring is performed in the immediate postoperative period after the tracheostomy. Problems or complications that could arise later:

Leakage around the opening (the stoma, is indicated by the expulsion of secretions, air leakage during ventilation or an impaired voice. If these complaints are severe or persistent, the cannula can be replaced with a larger size.

Infection around the stoma opening

Redness, pus, swelling and occasional pain around the opening of the stoma could indicate an infection. This is usually treated locally.

Infection in the airways/lungs

The general feeling of unwellness, fever, elevated cough, breathlessness, pain, blood in the mucus or changed volume, colour or consistency of the mucus can all indicate infection and must normally be treated with antibiotics. More effort must also be applied to clearing secretions.

Formation of scar tissue, granulated tissue

  • Granulation tissue can form around the opening of the stoma. This can lead to pain when changing the cannula, minor bleeding and discomfort. It is normally treated locally with silver nitrate sticks and by preventing cannula chafing.
  • Granulation tissue can form at the tip of the cannula inside the trachea. It can cause bleeding and problems when changing the cannula and, in some cases, make mechanical ventilation difficult. In general, the doctor will examine with a fibre-optic camera (bronchoscopy) to look for this type of problem on suspicion. If present, the cannula will normally be changed and adjusted to prevent chafing in the same area. Surgical treatment is rarely necessary.

Miscellaneous

  • Sores in the trachea from suction damage can give minor bleeding. Too much air or liquid in the cuff can expand the trachea or lead to a narrowing (stenosis). This is best prevented by adequate cuff maintenance routines.

Acute adverse events can occur with a tracheostomy. Read more about this under Acute adverse events.

Changing cannulas and inner cannulas

Tracheostomy care routines aim to maintain the size of the stoma, prevent skin irritation and infection, reduce the risk of infection in the airways and to prevent mucus from blocking the cannula. If you have a tracheostomy, it is important that those who will be helping you are given adequate training on caring for a stoma and the cleaning of an inner cannula (if applicable). Generally, a doctor or specially trained personnel will change/replace a cannula once per month/every 30 days at an outpatient clinic or in your own home.

With a tracheostomy, you are more exposed to infection. Therefore, good hygiene is important to prevent infection.

The skin around the cannula and the inner cannula (if applicable) is washed twice per day or more often, as required. You and those helping you must also be trained in the following:

  1. Caring for a tracheostomy.
  2. How to clean a cannula and inner cannula.
  3. How to use suction and suction techniques.
  4. How to change a cannula.
  5. How to use a Lærdals bag (resuscitator).

You can find an example of tracheostomy procedures here (external page).

Living with a tracheostomy: Øyvind’s story

Cannulas

Types of cannulas

.

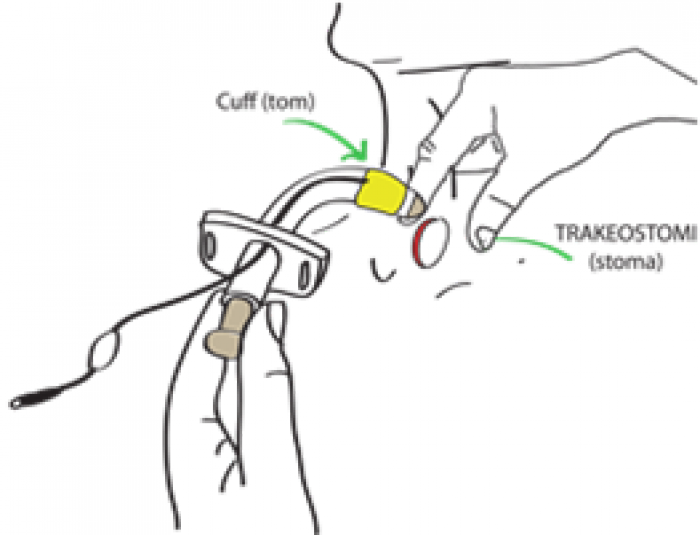
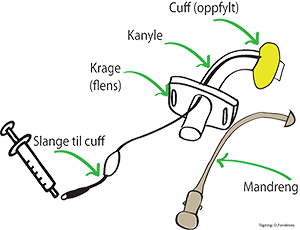
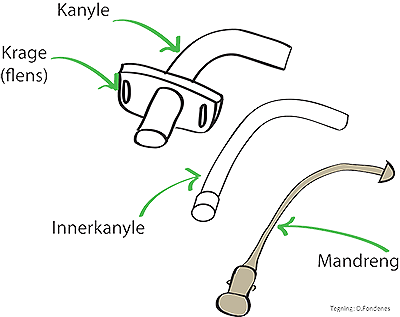
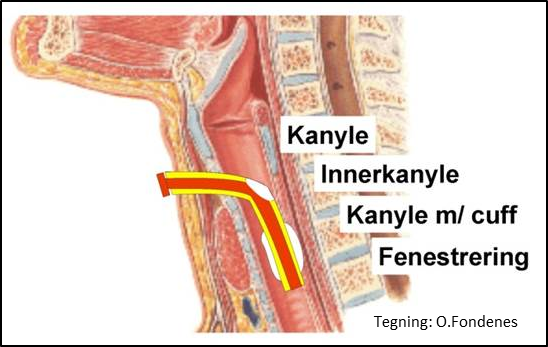
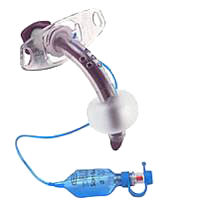
Tracheostomy cannulas are made of plastic, silicon or silver. Their features, curvature and size vary. Cannulas are designed with or without an inner cannula, cuff (circular-shaped balloon around the cannula) and fenestration (window). Customised cannulas can be made for users when necessary due to complications or unusual anatomy. A standard cannula is suitable for most users. Cannulas are held in place by a neckband.

The patient’s airways and functional requirements will determine which cannula to choose. Furthermore, the routines and experience of those in charge of the treatment and the experiences of the patient along the way will also play a role. The type of cannula can also be changed as required. For safety reasons, the user must always have an extra cannula and inner cannula (if the user has one) and a ventilation bag at home.

The diameter of the point on the cannulas for connection to the ventilator tube and ventilation bag has been standardised.

Inner cannulas

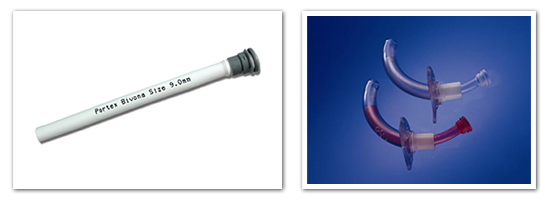
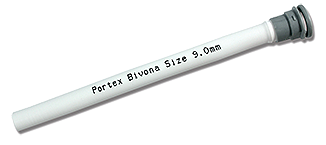
Tracheostomy cannulas are designed with and without an inner cannula. An inner cannula is a cannula that can be placed inside the tracheostomy cannula. The inner cannula can be quickly removed if the user develops stagnated secretions or clots of mucus in the cannula. However, the inner diameter will be reduced, which can affect ventilation. Inner cannulas are made of either plastic or silicon.

.

Changing cannulas and inner cannulas

For hygiene and safety reasons, it is necessary to change cannulas regularly. Frequent changing can reduce the risk of infection, formation of granulated tissue and cannula occlusion.

Recommended: Change cannulas every 30th day or more frequently, for example, with suspected blockage of the cannula, especially if blockage is still suspected after trying other methods to open the airways (suction, cough assist machine, changing of the inner cannula, if applicable).


Cleaning cannulas

To prevent infection it is recommended to regularly remove the cannula (inner and outer) for cleaning. Be prepared for the procedure, inform the patient and make sure the required equipment is in place when cleaning starts.

http://www.helse-bergen.no/no/OmOss/Avdelinger/heimerespiratorbehandling/Sider/Trakeostomi.aspx

How to change an inner cannula

An example of how to change an inner cannula using a Bivona Tracheal Cannula TTS is found below.


.

Equipment

  • Clean and non-sterile gloves.
  • Changing set (forceps and cleaning sponges).
  • Or cotton applicators + ointment.
  • Mesh gauze
  • Inner cannulas
  • NaCl 9 mg/ml for washing the skin (or 1% Chlorhexidine).
  • Tracheostomy tape with Velcro fastening.
  • Waste bin

Preparation

  • Gather the above equipment and have it close at hand.
  • Inform the patient about the sequence of events.
  • Position the patient in a way that allows him/her to stretch out and bend the neck at the same time.
.


Execution

  • Thoroughly wash your hands with soap under running water or alternatively use an approved anti-bacterial soap.
  • Put on clean gloves.
  • Remove the inner cannula from the cannula: hold the cannula shield, grab the ring on the inner cannula and pull it out of the locked position.
  • Insert a new inner cannula and press it down ‘to lock’.
  • Loosen the cannula tape and remove the old mesh gauze whilst holding the cannula in place.
  • Inspect the tracheostomy opening:
    • Signs of infection: soreness, pus, swelling, discoloured mucus.
    • Granulation tissue (‘wild meat’): can be dabbed with a silver nitrate stick (or it can be removed by a doctor). It can also be dabbed with Nelex, which is the same as Albothyl concentrate 36% vaginal solution, 100 ml bottle.
    • Bleeding
  • Wash the skin around the cannula with applicators soaked in NaCl 9 mg/ml.
  • (With infection: wash with Chlorhexidine 1% solution)
  • Thoroughly dry the area around the stoma with gauze and forceps.
  • A small amount of ointment, e.g., barrier cream or zinc ointment, can be applied to the stoma if there is redness/irritation.
  • In the event of infection: apply antiseptic cream, Brulidine 0.15% or Cavilon barrier film (box of 25 x 1 ml with sponge).
  • Place a new mesh gauze under the wings of the cannula.
  • Attach the cannula tape. It must be possible to insert one or two fingers under the tape at the base of the neck. Replace the cannula tape as needed.

Post-execution

  • Put the equipment away.
  • Discard used materials.
  • Wash your hands.

The instructions are exemplified below.

http://www.helse-bergen.no/no/OmOss/Avdelinger/heimerespiratorbehandling/Sider/Trakeostomi.aspx

Cleaning an inner cannula

It is important to follow the inner cannula cleaning instructions to prevent infection.


.
  • Wash the inner cannula with sterile saline solution. Use the cleaning brush for Bivona inner cannula (BICSWB, cannula brush, Bivona tracheostomy).
  • Do not soak the inner cannula.
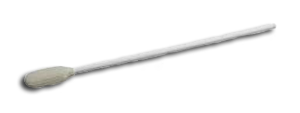
  • Insert the cleaning brush into the inner cannula and twist it as you pull it out.
  • Discard the brush after use.
  • Check that the inner cannula is clean and free of dirt, If not, repeat the cleaning procedure with a new cleaning brush until the cannula is clean.
.
  • Inspect the inner cannula for damage/kinks after cleaning. If damaged, discard and replace the cannula.
  • Leave the inner cannula to air dry.
  • Wrap it in sterile gauze.

Post-execution

  • Put the equipment away.
  • Discard used materials.
  • Wash your hands.

Recommended: Inner cannulas should be cleaned morning and evening. Outer cannulas are cleaned in connection with replacement, at least once per month. After cleaning, carefully inspect the cannula(s) for cracks and damage, and ensure that the shield has not loosened from the cannula.

http://www.helse-bergen.no/no/OmOss/Avdelinger/heimerespiratorbehandling/Sider/Trakeostomi.aspx


Suction

Suction involves a low pressure-producing device and the actual suction catheter. The cannula makes the windpipe narrower, which makes it more difficult to cough up mucus. In addition, many of those with a tracheostomy also have a disease that weakens the ability to cough.


.

Sug er derfor et viktig hjelpemiddel for å få opp slim fra luftveiene. Sug kan brukes i kombinasjon med andre hosteteknikker eller som slimmobiliserende teknikk alene. Sug kan også brukes til å fjerne slim fra munnen. Alle som har trakeostomi skal ha sug.

Using suction

When should suction be used?

  • When ‘crackling’ can be heard or the vibration of secretions can be felt upon aspiration.
  • When alarms (high pressure or low volume) on the ventilator sound (see the applicable chapter).
  • When the user wants it.
  • With acute breathing problems (see the applicable chapter).
  • With mucus clearing procedures.

Problems that could arise if the wrong suction technique is used

  • Patient discomfort
  • Damaged mucous membranes in the airways.
  • Increased production of mucus.
  • Risk of infection.
  • Mucus can accumulate in the cannula or airway.

During suction, the ventilator is disconnected and the user does not receive air during suction. This can be uncomfortable. Good cooperation with the user is essential. Therefore, it must be done calmly, quickly and efficiently. If suction needs to be repeated several times in a row, make sure that the ventilator is reconnected or a bag is used between each suction. 

Equipment

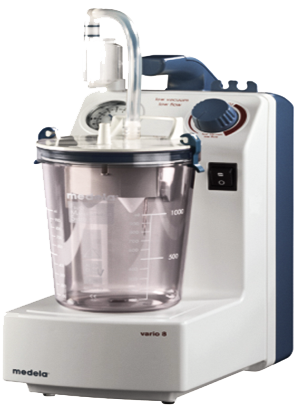
Suction devices

  1. A suction catheter is a sterile disposable catheter, which must be discarded after each suction or after each performed procedure.
  2. Suction tube - a tube from the suction flask to the suction catheter. Must be replaced once every 24 hours or with extensive contamination.
  3. Suction flask - to be replaced as necessary. With multiple flasks: once every 24 hours.
  4. A supply of water for flushing the suction tube. Containers/bottles of tap water for flushing the suction tube upon disconnection of the suction catheter.

Suction catheters

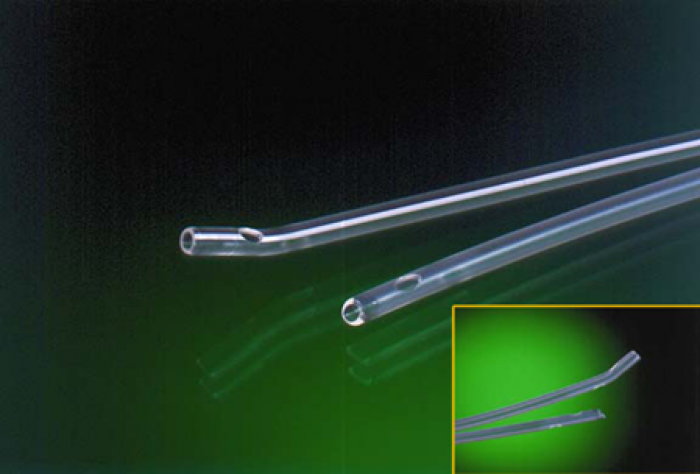
A suction catheter is a pipe, which must be connected to a suction device to remove secretions in the mouth or tracheal cannula. There are two types of suction catheters.

.
  1. Straight
  2. Curved

Both types are available in different lengths. Suction catheters also vary in thickness. Suction catheters are selected based on the size of the patient’s cannula.

Suction inside a cannula

When suctioning the cannula, suction is limited to the actual cannula. This is how suctioning is most commonly used. Therefore, measure how far the suction catheter will be inserted beforehand. The suction must not go further than approx. 0.5 cm of the end of the cannula inside the windpipe. This can be done, for example, by placing a suction catheter at the side of the user and marking off the correct length.


This technique is used to remove mucus in the actual cannula. Thus, mucus here may be spontaneously coughed up or when using a cough assist machine. The removal of mucus prevents the accumulation of mucus on the inside of the walls of the cannula and gradual blockage therein. By clearing the mucus in the actual cannula and then removing it with suction, one ensures that the suction does not come into contact with tracheal mucous membrane. Regular suction prevents the cannula from becoming blocked. Therefore, it is generally recommended to use suction in the cannula in the morning and evening as a permanent measure, or as needed.

Deep suction technique

With the deep suction technique, suction is passed down via the cannula until resistance is felt, the suction is then activated and suctioning is performed on the way out. This technique clears mucus that is stuck in the lower airways at the bottom of the cannula. Sometimes this technique is used regularly instead of, or in addition, to a cough assist device. This technique is often used in emergency situations when mucus cannot be cleared by other method. If this technique is used frequently, it can increase the production of mucus or damage respiratory mucosa.

Removing mucus above the cuff

If a cannula is used with a cuff, the mucus can accumulate over the cuff inside the windpipe. The mucus can cause problems when purging the cannula of air or water, as it could move down into the lungs. The mucus can also move down into the lungs even if the cuff is used, thus presenting a risk of infection. Subsequently, a foul odour could arise and it could leak out on the side of the cannula.

Some patients do not experience any problems at all with mucus. When replacing a cannula or purging the cannula in order to talk, various techniques can be used to manage the mucus. The airflow can be used to blow the mucus up into the mouth, as the airflow will lead the mucus into the mouth as the cuff is purged. The airflow can be created by a bag or cough assist machine.

The mucus can also be removed by using a cannula as an extension of suctioning by withdrawing the mucus as the cannula is replaced. Some cannulas have a separate suction channel above the cuff; others remove the mucus above the cuff everyday, whilst others only remove it when the cannula is replaced. In general, it cannot be said that one method is better than another. The doctor in charge of the treatment will, in consultation with the user, determine the best method for him/her.


A video showing how mucus is removed above the cuff when replacing a cannula.

Ventilation bag

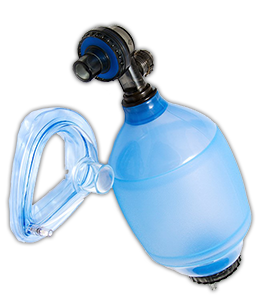
Bag ventilation is one of the methods that can be used to get additional air down into the lungs when a patient requires manual respiratory support. The bag is a thick-walled, self-expanding rubber ‘balloon’ that is inflated with ambient air and then squeezed to blow air into the patient. Consequently, the bag is a spare ventilator.


.

A bag ventilator must be used when the ventilator is out of order or in other emergency situations. It can be used during transportation, to mobilise mucus and during tracheal suctioning. Everyone who has a ventilator and tracheostomy shall have a bag. The bag must be accessible at all times, and complete and ready to use. The objective is to maintain normal breathing when carrying out procedures and/or disconnecting from a ventilator.

Equipment

For manual ventilation, you need a ventilation bag with a mask for an adult that covers the mouth and nose, and a paediatric mask that covers the stoma and bag attachment of the tracheostomy.

Method

Otherwise, good hand hygiene is paramount. Wash your hands or alternatively use an approved anti-bacterial soap.

  1. Wear clean gloves.
  2. Connect the bag to the cannula or mask.
  3. Ventilate the user by squeezing the bag -
    1. squeeze with one hand;
    2. ventilate approx, every five seconds between each squeeze or ventilate following the user’s own breathing pattern.
  4. Work calmly and observe the user.
  5. Disconnect the bag from the cannula and use suction to remove the mucus in the cannula.
  6. If there is still mucus in the cannula, repeat this procedure.

The video below demonstrates manual ventilation with bag ventilation connected to a tracheostomy.


Cleaning

Clean the bag every day or as needed in the following way:

  1. Disassemble the bag.
  2. Rinse the parts with running tap water.
  3. Place the parts in lukewarm water (30 to 40 degrees) for at least two minutes.
  4. Add detergent (washing-up liquid) and hot top water (60 to 70 degrees).
  5. Thoroughly clean all surfaces and use a brush if necessary.
  6. Rinse all the parts in lukewarm water.
  7. Dry all parts.
  8. Check that all the parts are clean and dry before reassembling them.

Communication

Communication via speech is possible with a tracheostomy. Some practise is needed, and one has to adjust to the cannula and ventilator.

Fenestrated cannula and speech cannula

In order talk, it must be possible for the air that you breathe to pass through the glottic chink and not through the cannula again. This can be done in two ways. Method one: The air must flow up the side of the cannula. This can be accomplished if the cannula is slightly smaller than the diameter of the windpipe, in which case a cuffed cannula is not normally used. Some users have a cuffed cannula in periods when they will not be talking, e.g., when asleep.

Method two: By using a fenestrated cannula. This type of cannula has a hole in the curve that allows air to pass through the glottic chink to facilitate speech. A fenestrated tracheostomy cannula has two different inner cannulas; one with and one without fenestration.

  • The inner cannula with a window is used when one wants to talk.
  • The inner cannula without a window is used at mealtimes, during dental care, etc., to reduce the risk of food, etc., entering into the windpipe.

Fenestrated cannulas are rarely used now. They can chafe respiratory mucosa at the edge of the hole in the curved section. The best method will be determined in consultation with a doctor experienced in cannula adaptation, and the individual’s own experiences will also be taken into account.

Both of the methods described above need the air to pass upwards via the vocal cords. The air will leave the lungs where it meets the least resistance. Different methods can be used to get the air out via the vocal cords and not the cannula. The easiest way is to set the ventilator to produce some slight resistance during expiration (positive expiratory pressure, PEEP) or a separate speech valve can be used. This opens upon aspiration and closes with expiration, and forces the air upwards passed the vocal cords, as illustrated in the image below.

.

Assistive communication devices

Some with a tracheostomy have functional impairments that prevent them from talking or they have problems with using modern assistive communication devices. Communicating with others is crucial in order to participate in everyday life, and for one’s self-esteem and quality of life. Losing the ability to communicate with others is a challenge and difficult in itself. When one loses the ability to speak/communication skills it can lead to isolation, the loss of one’s identity, dignity and personality. Communication can also include the ability to call for help, attract attention, use a computer, etc. Individual adaptation of assistive communication devices is essential for tracheostomy patients. The most common assistive communication devices, such as telephones and the Internet can be adapted to users with functional impairments, but many other more special assistive devices are also available. We will describe some of them in the following.

Eye gaze communication boards

.

There are many types of eye gaze communication boards and letter boards. For some, eye movements are the only movements that are controlled by their own will. An eye gaze communication board is an assistive device and a method created for users to communicate by pointing out definitions with their gaze. An example of such a board is one with letters and a square hole in the middle. This enables the user to communicate with the aid of eye movements. The assistive device might be helpful if:

  • the user cannot talk or the user’s speech cannot be understood by anyone but close relatives;
  • it is very difficult for the user to use his/her hands;
  • the user does not have an assistive communication device or has assistive devices that are not in use.

Some gaze communication boards are electronic. One’s own sentences and expressions can easily be added to facilitate communication The boards have a display on both sides to show what the user is saying. Subsequently, conversation is easier for the user and his/her helpers. No calibration is required, and the position of the head and unit can be moved. They are easy to use and require little training. Both symbols and images can be used and you can also create your own symbols.

Lightwriter

.

A Lightwriter is a text-to-speech device, similar to a typewriter with a screen. The person who cannot talk writes a message on the keyboard, which is then displayed on two screens - one for the user and one for the helper. It is easy to use and requires little training. The newest version of the Lightwriter has a built-in mobile telephone that facilitates text messages and the option for text-to-speech with synthetic speech sent to the person at the other end. The incoming speech message is broadcast through the Lightwriter’s loudspeaker. Lightwriters are available in many European languages.

Rolltalk 

Rolltallk can be used with impaired speech or motor skills. In addition to being an assistive communication device, Rolltalk can also, for example, steer a wheelchair, TV, radio, lights, heat, open doors, etc.

.

.

Rolltalk uses the Rolltalk Designer programme, which provides good options for individual adaptation of the content for communication, Internet access, writing e-mails and text messaging. Everything can be organised with both text and/or symbols.

My Tobii

If you have partial/full paralysis or involuntary movements, you can learn to talk with your eyes and gain access to an eye gaze-controlled computer. Tobii is an eye gaze-controlled system for those who cannot operate a computer with a standard keyboard and mouse. If you need an eye gaze-controlled computer, it will function in the same way as when using a keyboard and mouse.


Acute adverse events

This section concerns acute adverse events in connection with a tracheostomy and ventilator, and what helpers can do. Fortunately, acute adverse events are rare. Much of that described here concerning tracheostomies are routines to help prevent acute problems from arising. Nonetheless, there is a risk that an acute adverse event can arise, especially in terms of problems with the ventilator, cannula and airways. As the helper of someone with a tracheostomy, it is therefore essential that you are aware of what can happen and what you should do.

Click here to practise an imaginary emergency situation (in Norwegian)

Telephoning for help

In an emergency situation TELEPHONE the emergency number (113 in Norway)!

  1. If an emergency situation arises, always telephone for help.
  2. Remember that those at the other end of the telephone can help assess how critical the situation is.
  3. If the situation is not critical and you try to resolve the situation yourself, always bear in mind that you might have to telephone for help. The situation could get worse and it might be difficult to handle on your own.

Get other help!

  1. Can anyone else help?
  2. Other personnel nearby? Relatives?
  3. If the situation is not critical or resolved, and you are not sure what to do, you can contact the specialist department in charge of the treatment.

Remember to keep the following information at hand

  1. Emergency number: 113 (in Norway)
  2. The address of your current location.
  3. Telephone number of the duty room or similar if in an institution.
  4. Telephone number of the specialist department in charge of the treatment/therapy.
  5. GP’s telephone number.

Telephoning for help

  1. When telephoning for help it is important to remain calm and give the required information.
  2. ISBAA provides a guide on what to say during an emergency situation.

ISBAA

COMMUNICATION ABOUT THE PATIENT

I

Identification

Present yourself, your function, workplace/address

Present the patient’s name and personal identification number

S

Situation

”I’m telephoning because…”

”I’ve observed that…”

B

Background

State whether the patient has a cannula and ventilator.

Diagnosis Medical history in brief.

A

Analysis

”I’m concerned that…”

”The patient is deteriorating.”

”The patient is unstable.”

”I think the problem is that…”

A

Advice

”What do you think I should do?”

”What should I observe?”

Acute breathing difficulties

Acute breathing difficulties can arise for many reasons in connection with a tracheostomy or ventilator. Some examples are:

  • Ventilator problems
  • A pinched ventilator tube.
  • The cannula or other parts of the ventilator’s circuit can be blocked by mucus.
  • Mucus in the larger airways below the cannula or mucus further down in the lungs.
  • Conditions that affect parts of the lungs can cause breathing difficulties, e.g., pneumonia, partial collapse of the lungs due to mucus plugs, blood clots in the lungs and air leakage from the lungs into the space between the lungs and chest wall (pneumothorax).

It is impossible for helpers of ventilator users to know why breathing problems start. However, it is still important to learn how to help whilst waiting for professional help. The following provides a guide on how to assess the situation.

  • Examine the ventilator, ventilator circuit and cannula: Has the cannula fallen out? Is there a kink in the ventilator tube or is it blocked in any other way? Check whether the ventilator is blowing as it should.
  • Consider using a bag: Always have access to a bag! A bag allows you to give more air to the user than a ventilator. It is important to use a bag if the problem is not obvious (for example, a kink in the ventilator tube), but can easily be resolved or when the user still has insufficient air or the ventilator is not working or the situation is unclear.
  • Check the cannula: If the breathing difficulties do not improve with bag ventilation, check the cannula. The inner cannula, speech valve or filter could be blocked, if attached. These must be removed. Continue bag ventilation.
  • If the breathing difficulties continue, mucus could be blocking the cannula or airways below the cannula. Try clearing it with suction! Give bag ventilation!
  • Consider removing the cannula: If the breathing difficulties continue and the suction catheter cannot pass beyond the cannula, the cannula must be completely blocked. Remove the cannula! Should this be done, there are three options:
    • Bag ventilation with a paediatric mask covering the hole in the throat.
    • Bag ventilation with a large mask over the mouth and nose, whilst covering the hole at the same time.
    • Insert an emergency cannula and ventilate with a bag.

Sounding of ventilator alarms

Ventilator alarms can sound for many reasons. The most important thing to do when a ventilator alarm sounds is to assess the user.

  • Is the user having trouble breathing? If so, assess the situation as described under Acute breathing difficulties. Normally it will suffice to disconnect the ventilator, administer a bag and then find out which alarm has sounded. You could also connect to the spare ventilator if the situation is under control.
  • Is the user distressed? If a ventilator alarm is still sounding and not working as intended, use the spare ventilator. If the situation is then under control, find out which alarm has sounded.
  • If the user is not distressed and the ventilator seems to be working as intended, check the alarm. Consider using the spare ventilator.

Each ventilator has its own special alarms. The relevant alarms will also depend on how the settings of the ventilator have been set. These are described in more detail in the description of each ventilator.

Cannula falls out

It takes a lot for a cannula to fall out, as it is held in place by the cuff and cannula tape. Nonetheless, if the cannula is pulled, for example, when moving, it could fall out.

If it falls out, there are three options:

  1. Bag ventilation with a paediatric mask covering the hole in the throat (see the video below).
  2. Bag ventilation with a large mask over the mouth and nose, whilst covering the hole at the same time.
  3. Insert an emergency cannula and ventilate with a bag. Reconnect the ventilator.

Test your knowledge